

Hi Everyone,
Happy Thanksgiving Eve. Guess what? My son Cale came down with a bad cold, and so we decided I should stay put. Yes, I’m bummed, but it’s for the best as I very much needed some additional rest this week. I’m feeling much better now. And, Cale is coming next month– definitely.
Okay, today is part 2 of the two interior design problems that I began last Sunday. Can you guess what it is? It’s been the thorn of all thorns in my paw.
I’m happy to say that I’ve finally worked both of them out.
So, if you’ve read part 1, please click the link below to read part 2. If you’re just landing here, please read from the top of the page.
Part 2 Begins Here
Hi Everyone,
Today is a relatively short post.
I have two interior design problems.
Only two, Laurel?
Well, at the moment, two that are pressing on me.
The first one, you already know about. It’s the entry wall covering.
I have a lot of ideas, but let’s put that one on the shelf for now.
The second one is the Roman shades for the living room and den.
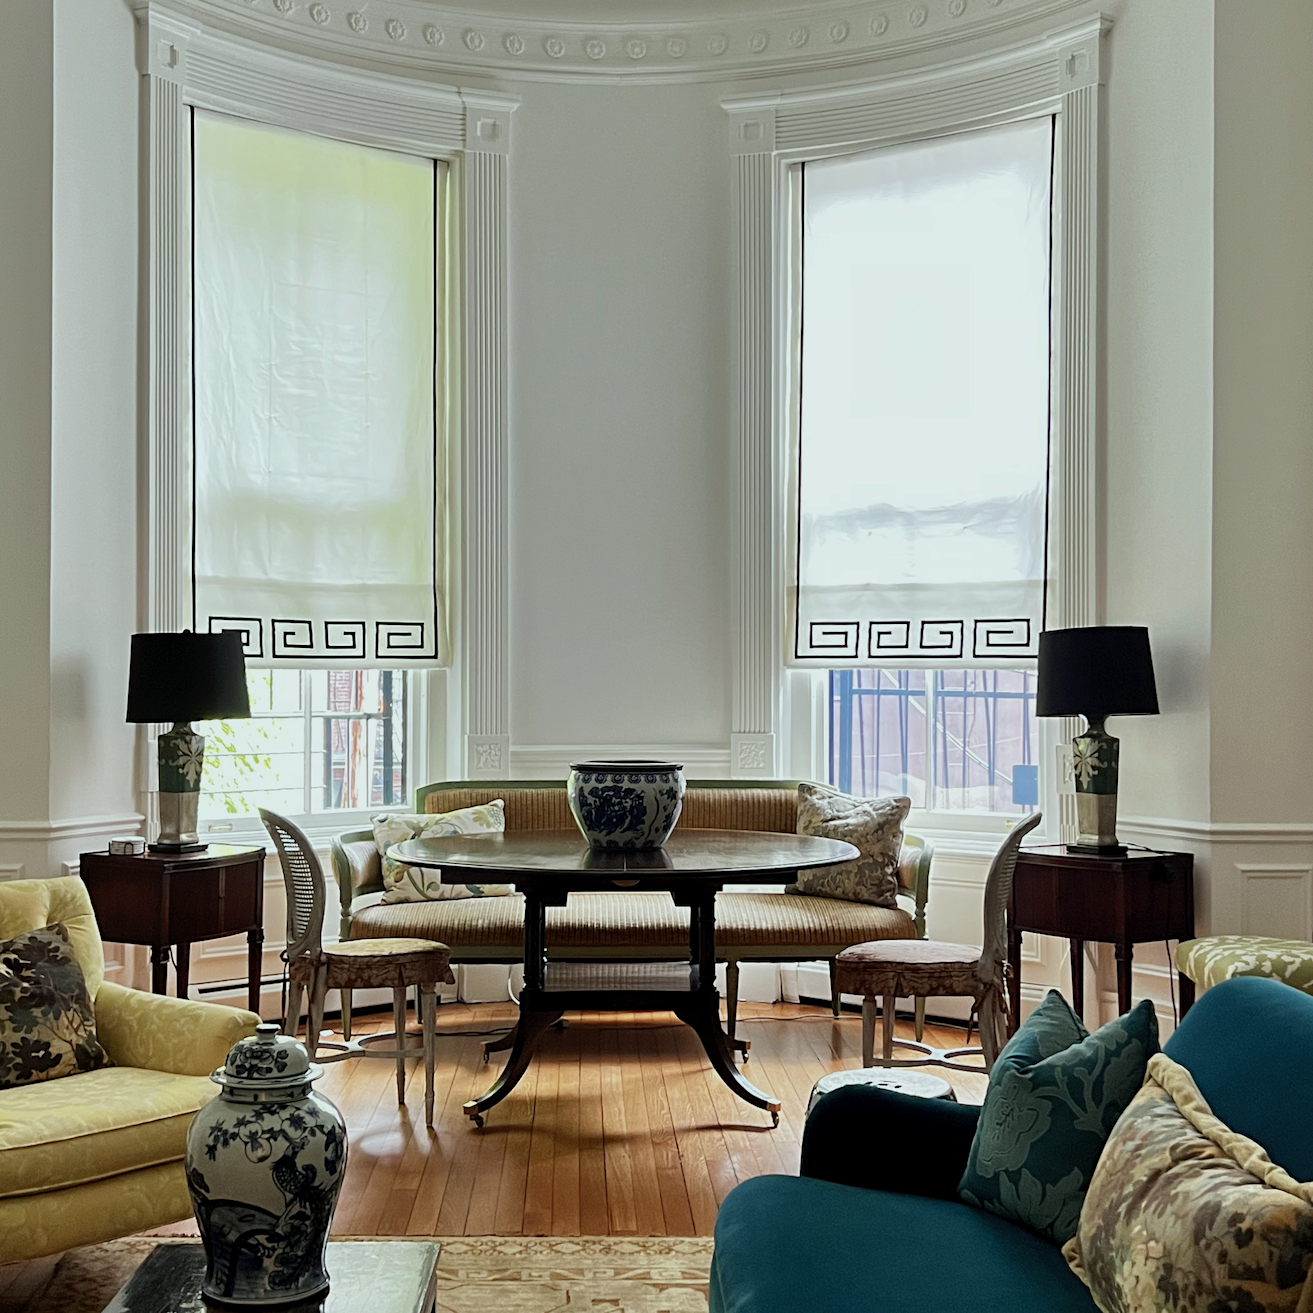
Some of you may recall that I got the beautiful shades last summer, and they don’t work because the cord is at least six feet too short when the shade is all the way down. The cord does not need to come to the bottom of the shade when the shade is down, but it should be easy to reach for someone who’s five feet tall.
In addition, I decided to have the shade made shy of the bottom of the window by 22 inches.
That was my mistake because when the sun is low in the sky, it does come pouring in for an hour or two in the late afternoon. In the summer, it isn’t an issue because the sun sets in front of my house, and I’m in the back. (with the dumpsters and rats).
Other than that, I love the shades.
I explained to Dianne, and she immediately insisted that she should do them over.
It took me a few weeks to sort out the lining, but she received everything last September.
Dianne contacted me a few weeks after to tell me she had been ill and it was taking longer than expected.
No problem, I told her.
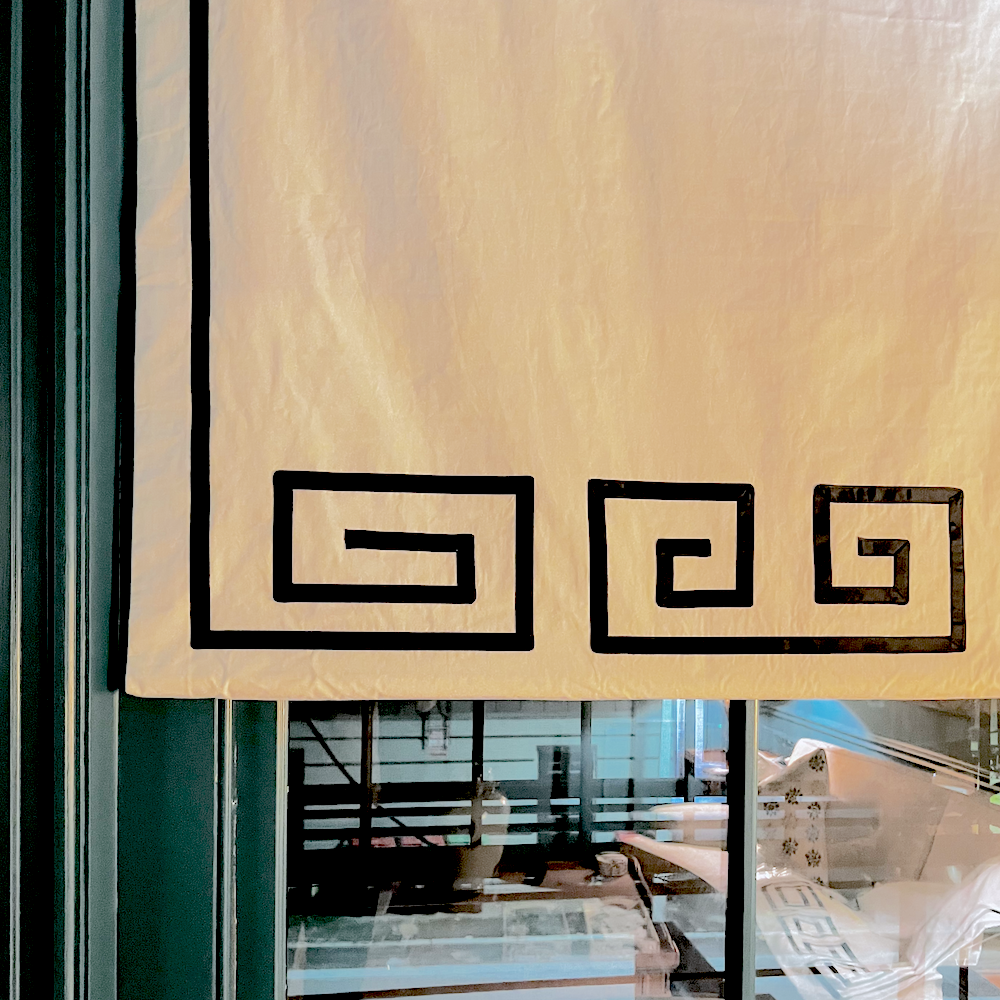
I received the shades about ten days ago.
Immediately, I opened the box and took out one of the shades.
To my horror, I instantly saw that the trim was wrong this time.
Below is the diagram I sent her, and on the left, you can see what she sent me for comparison.
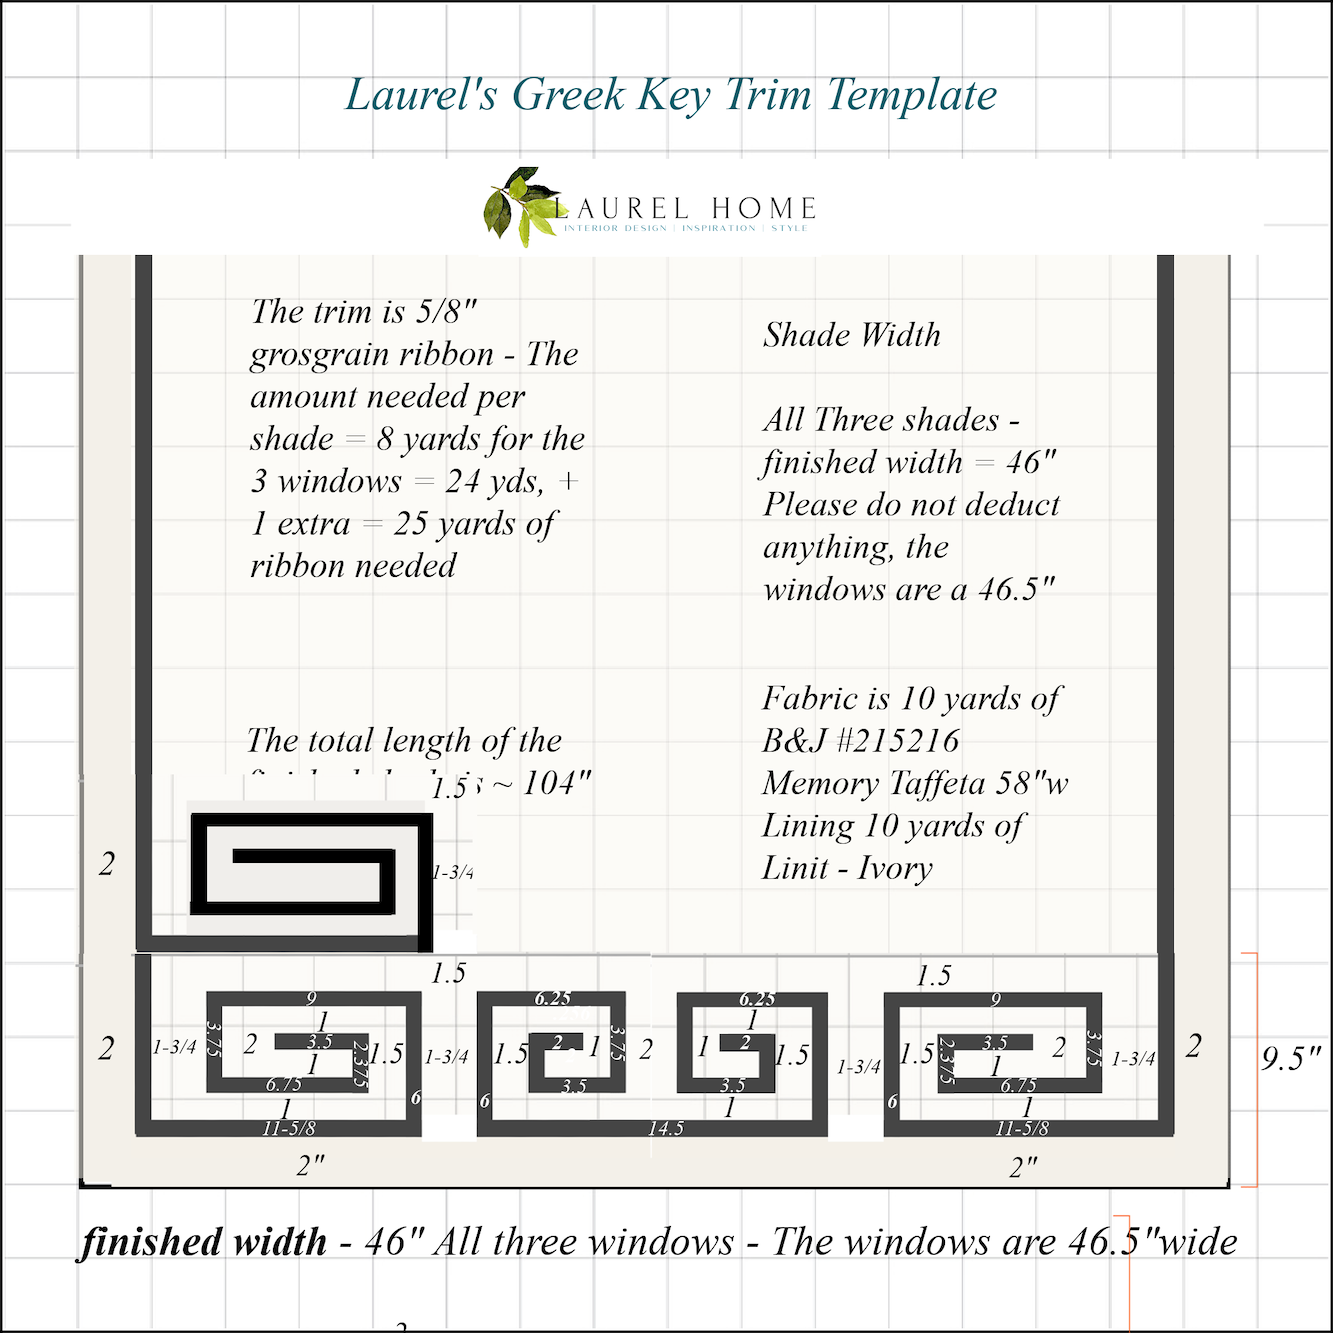
Above is the current den shade. The living room shades are different. That doesn’t bother me so much because both look good. But this new version, the pieces on the ends are way off.
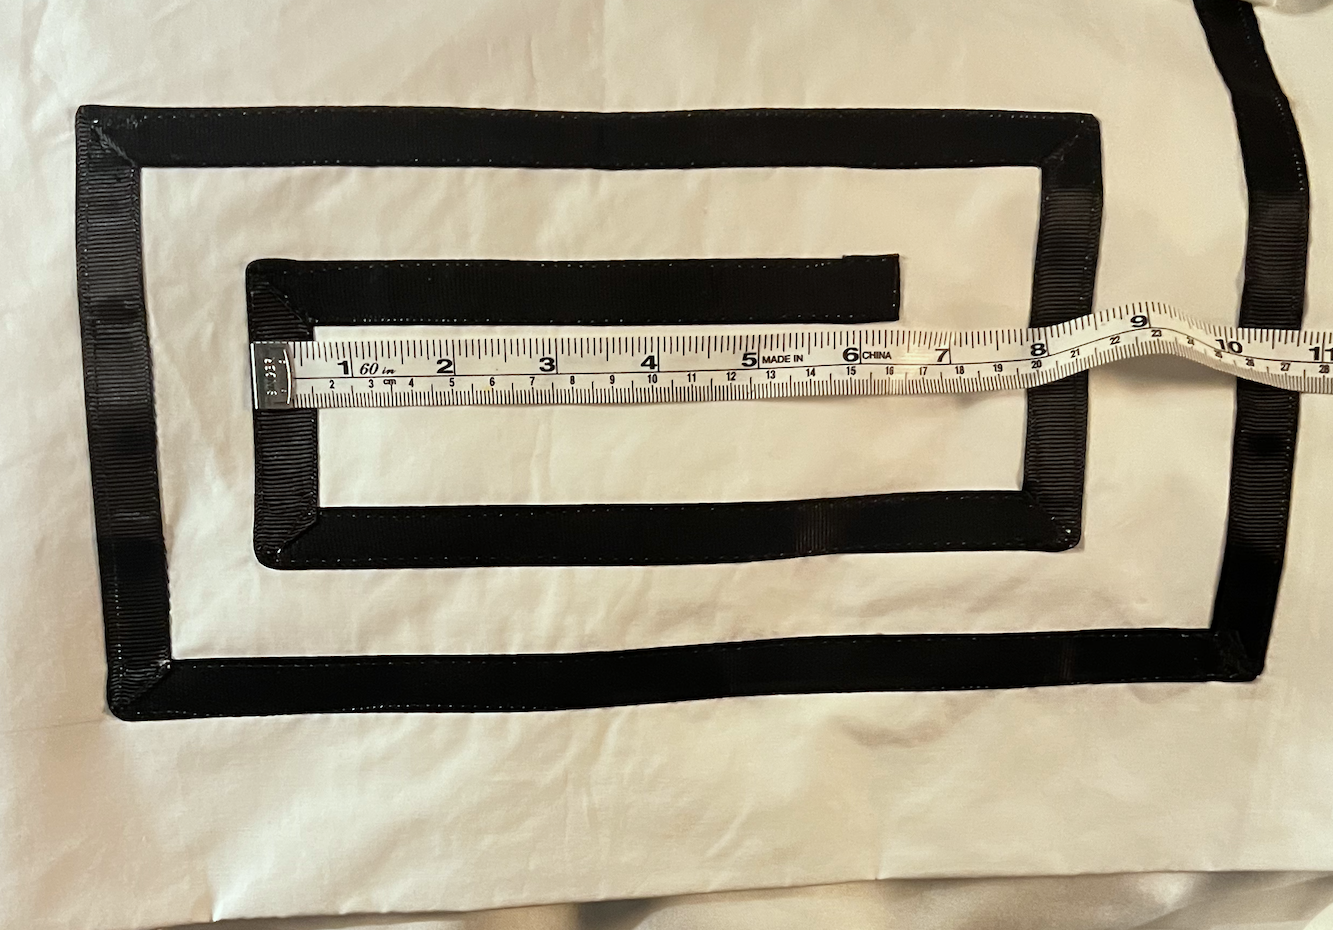
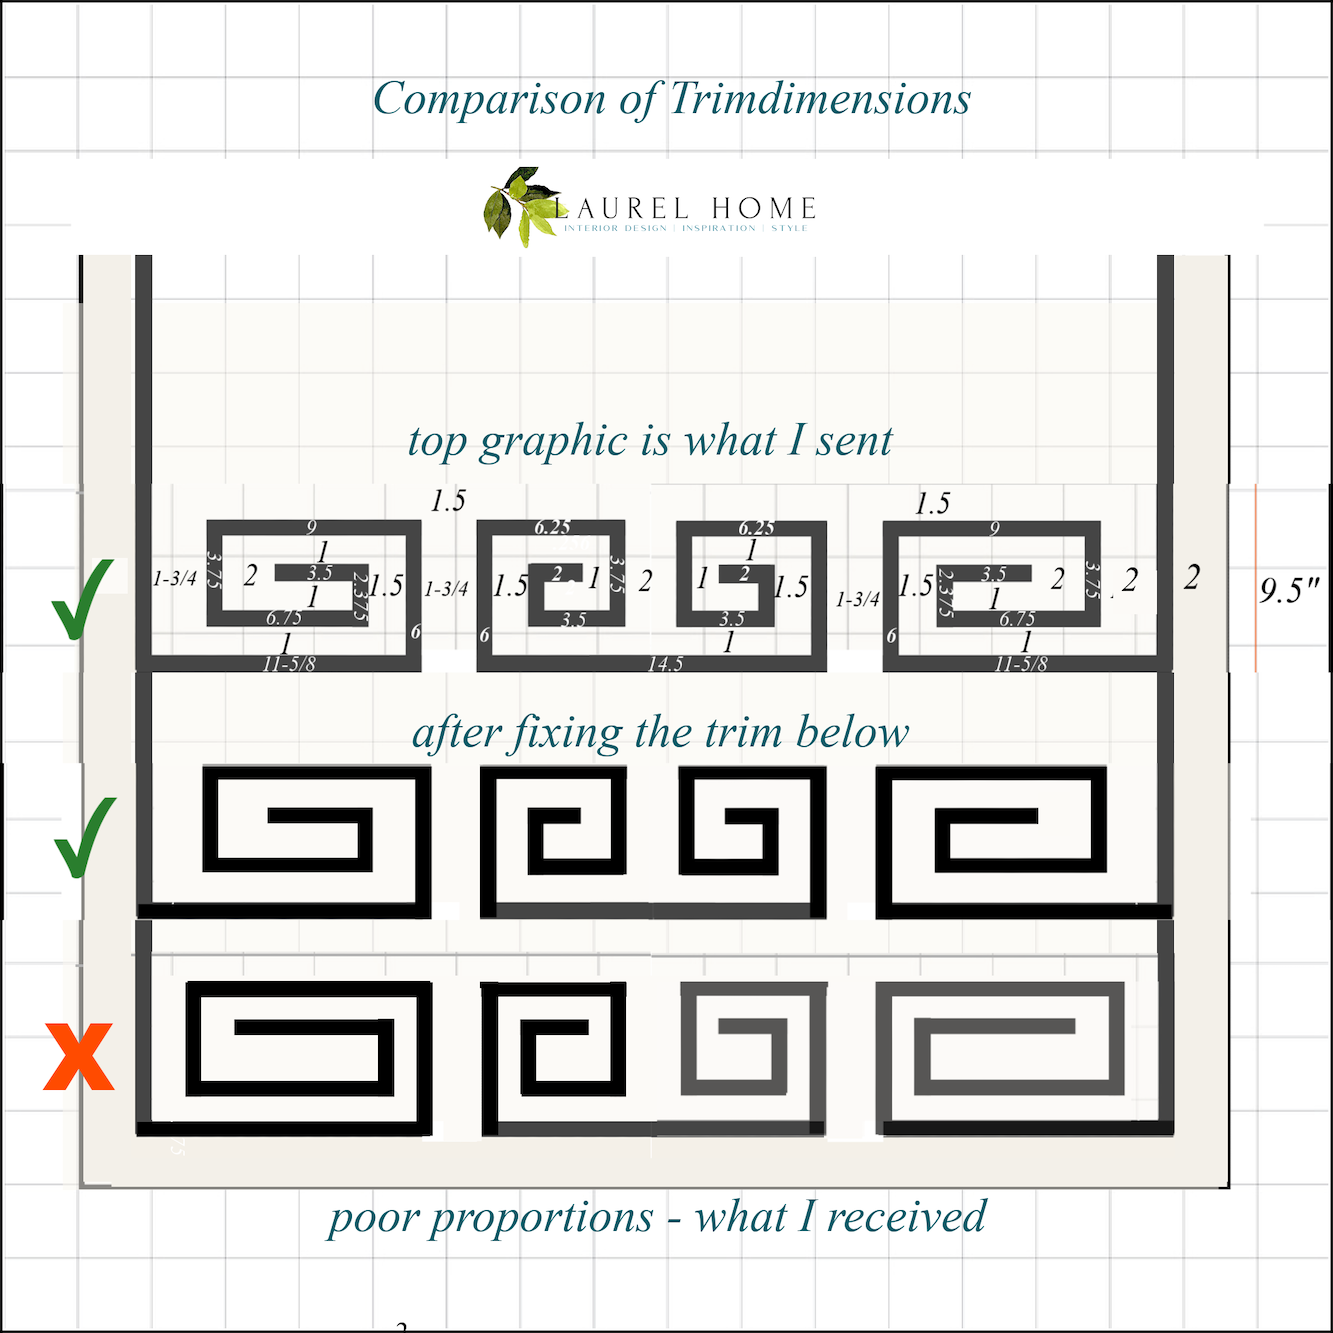
See the piece that measures 6-3/8″? If you scroll back up, you’ll see that it’s supposed to be 3.5″. I would’ve been fine if it were 4″, but it is almost 3 inches longer than specified.
Below is a graphic of what I received.
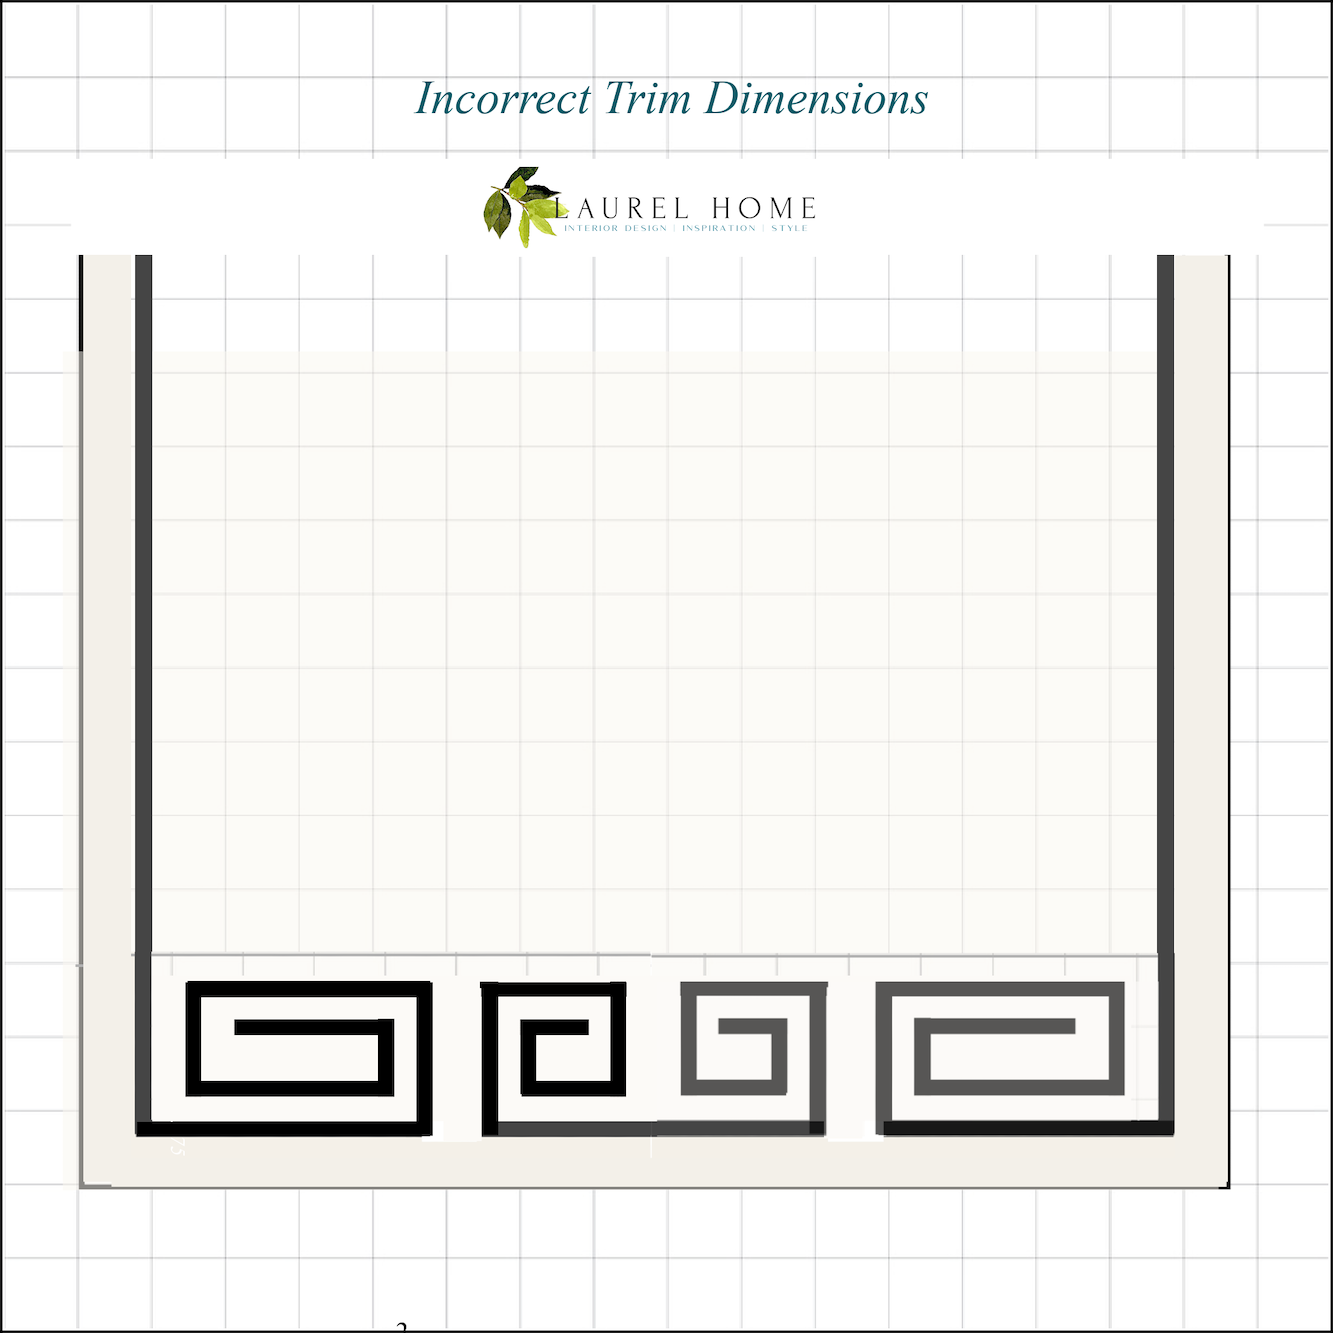
I wrote Dianne, and she got right back to me and said that she’s sorry I’m not happy. She said I didn’t send her the width of the trim.
No, of course not, because we already know that it’s 5/8″. I sent her the dimensions of everything in between the trim. Of course, for the longer pieces, I’m fine with a slight variation.
This is why I sent her precise dimensions.
I also asked if it was possible for me to take part of the trim off, or if it is glued?
It’s glued, and she doesn’t advise it. She also reminded me that she’s now retired.
Yes, I knew that. I wasn’t asking her to do anything.
However, instead of 3 dowels, she only sent 2.
She swore she packed 3, so I sent her a photo of the two dowels that are necessary to weigh down the bottom of each shade.
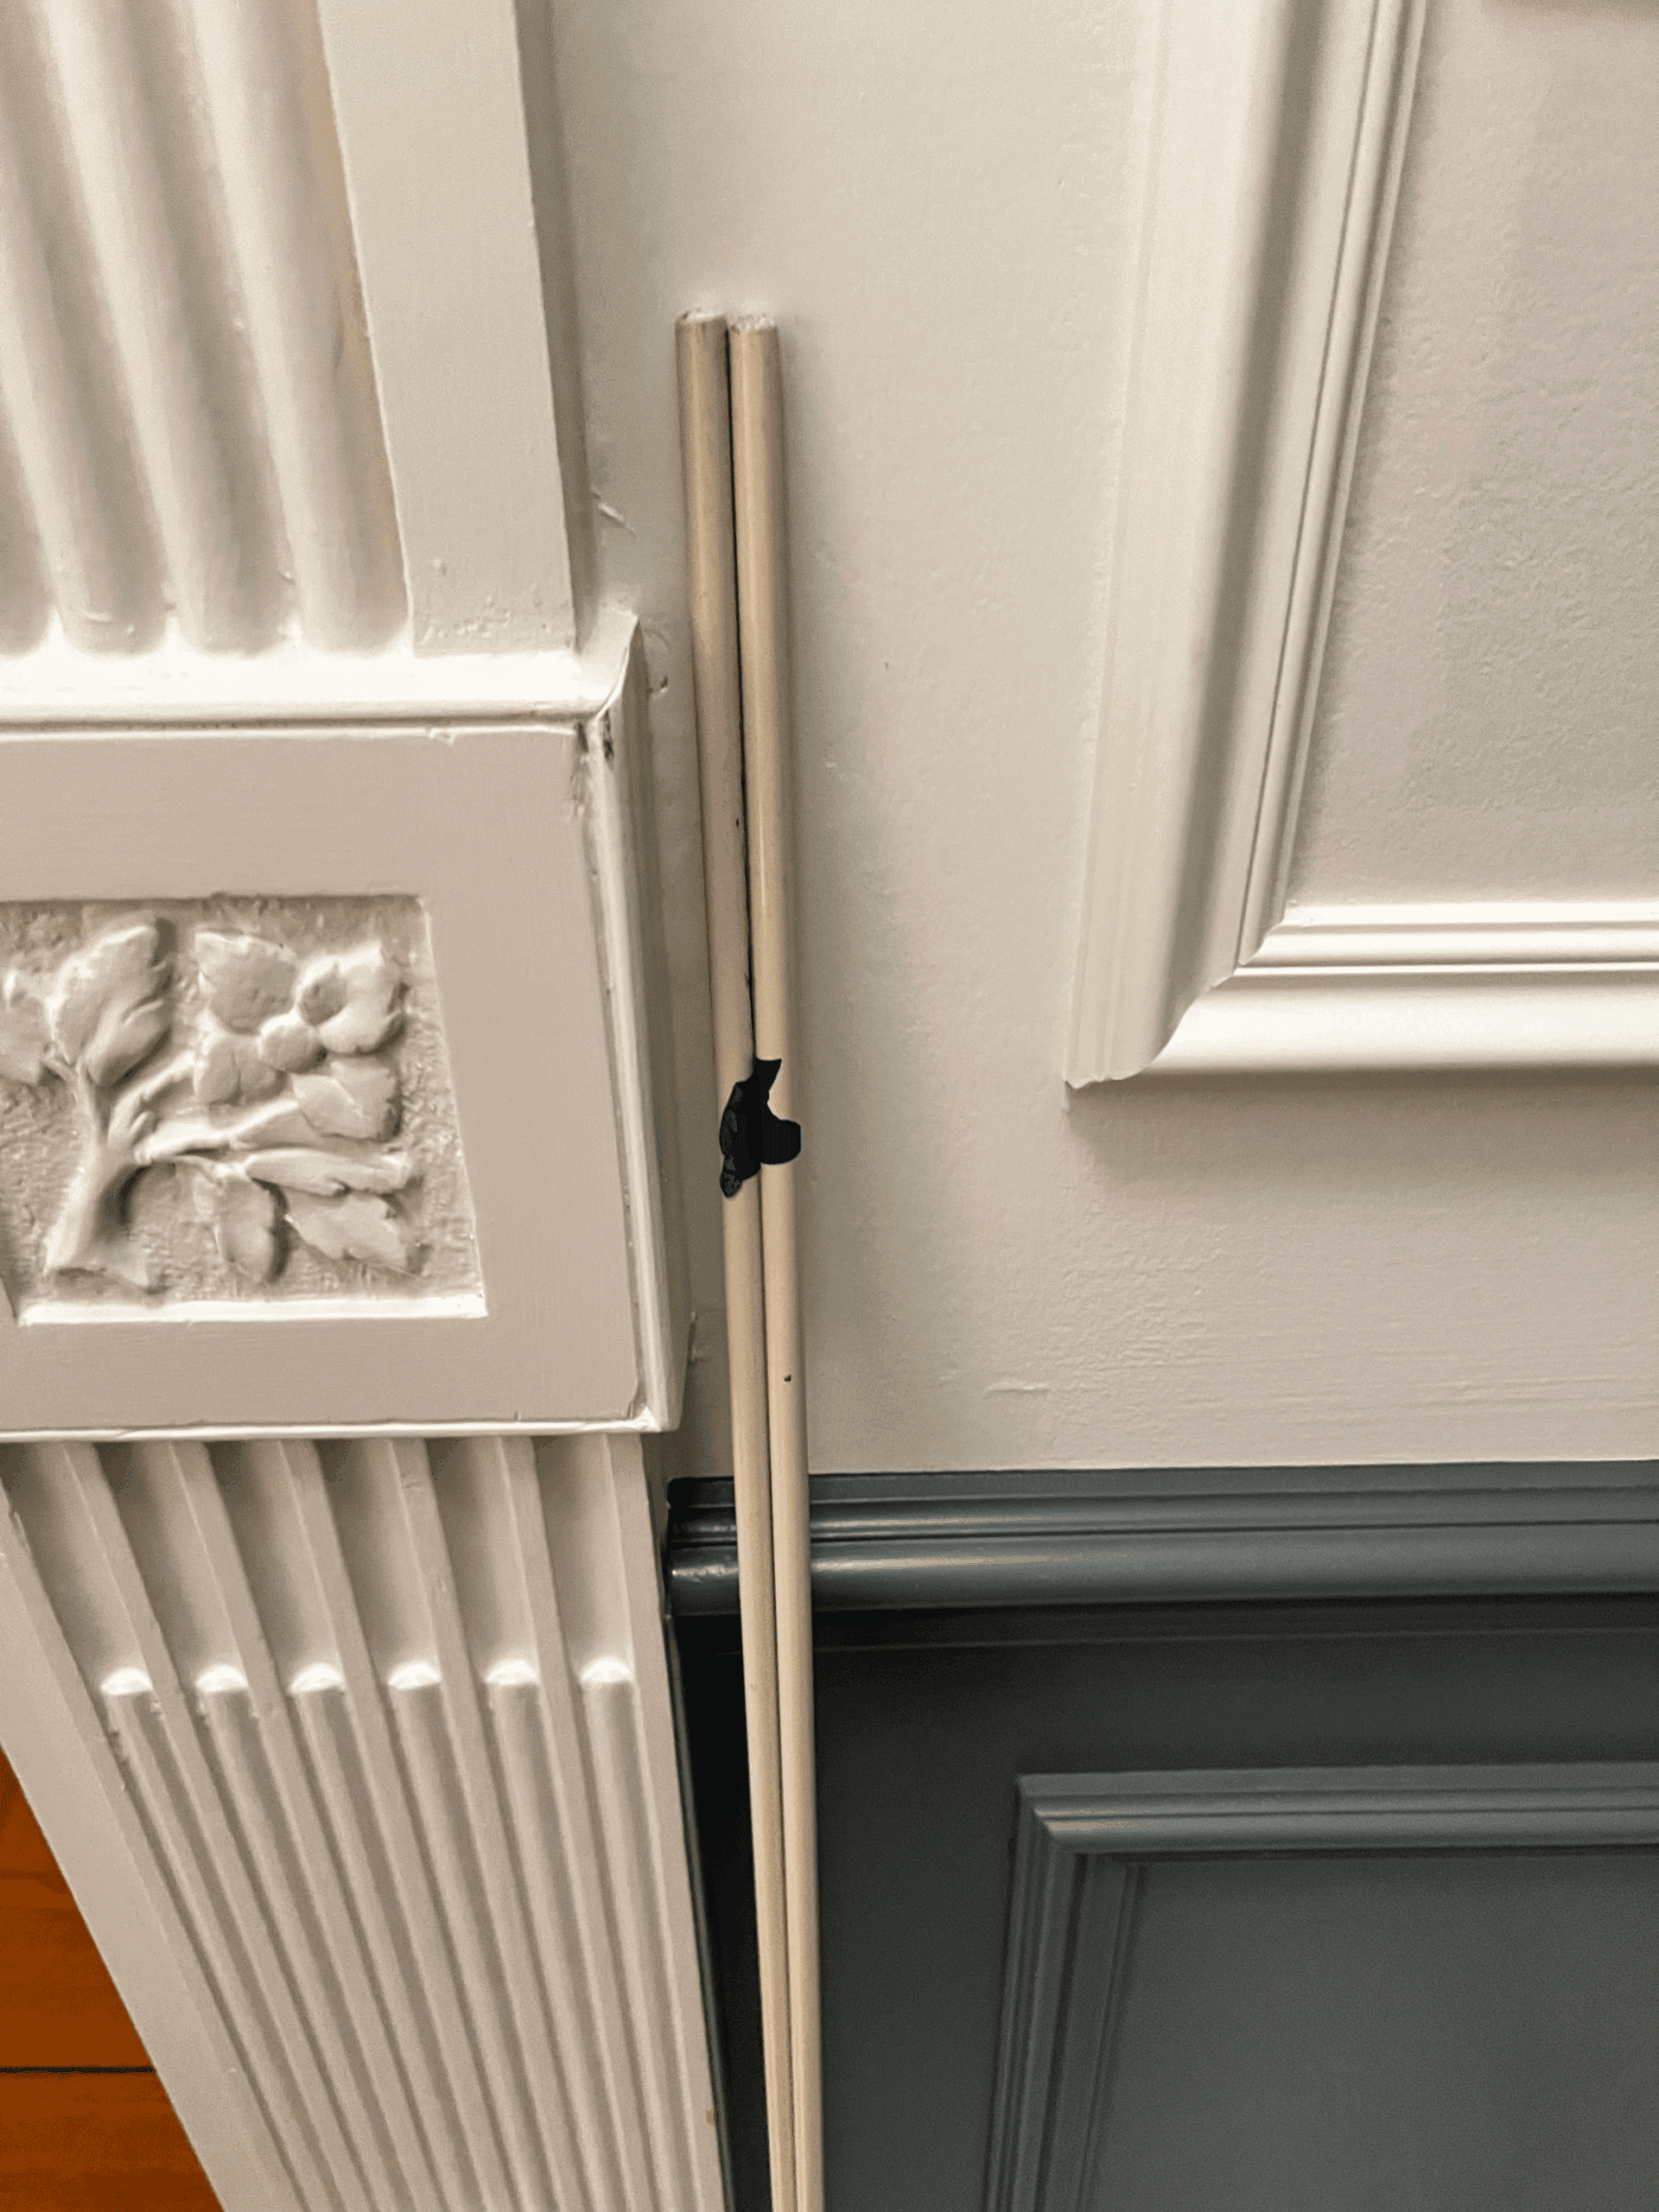
I sent her this image and asked if she was still in business.
No response.
I decided to sleep on it. Maybe I was just tired and would feel differently about the change in design in the morning.
Well, lo and behold, I did feel differently.
I hated them even more, but thought I should give it a few more days.
A few days later, I decided to see if I could take some of the trim off.
Yes, I can, and yes, there’s glue, but I can get it off.
It is slow, tedious work, but I notice these shades every day, and if they look like this, it’s going to bug the crap out of me.
So, I did another graphic to see if I could make the trim better.
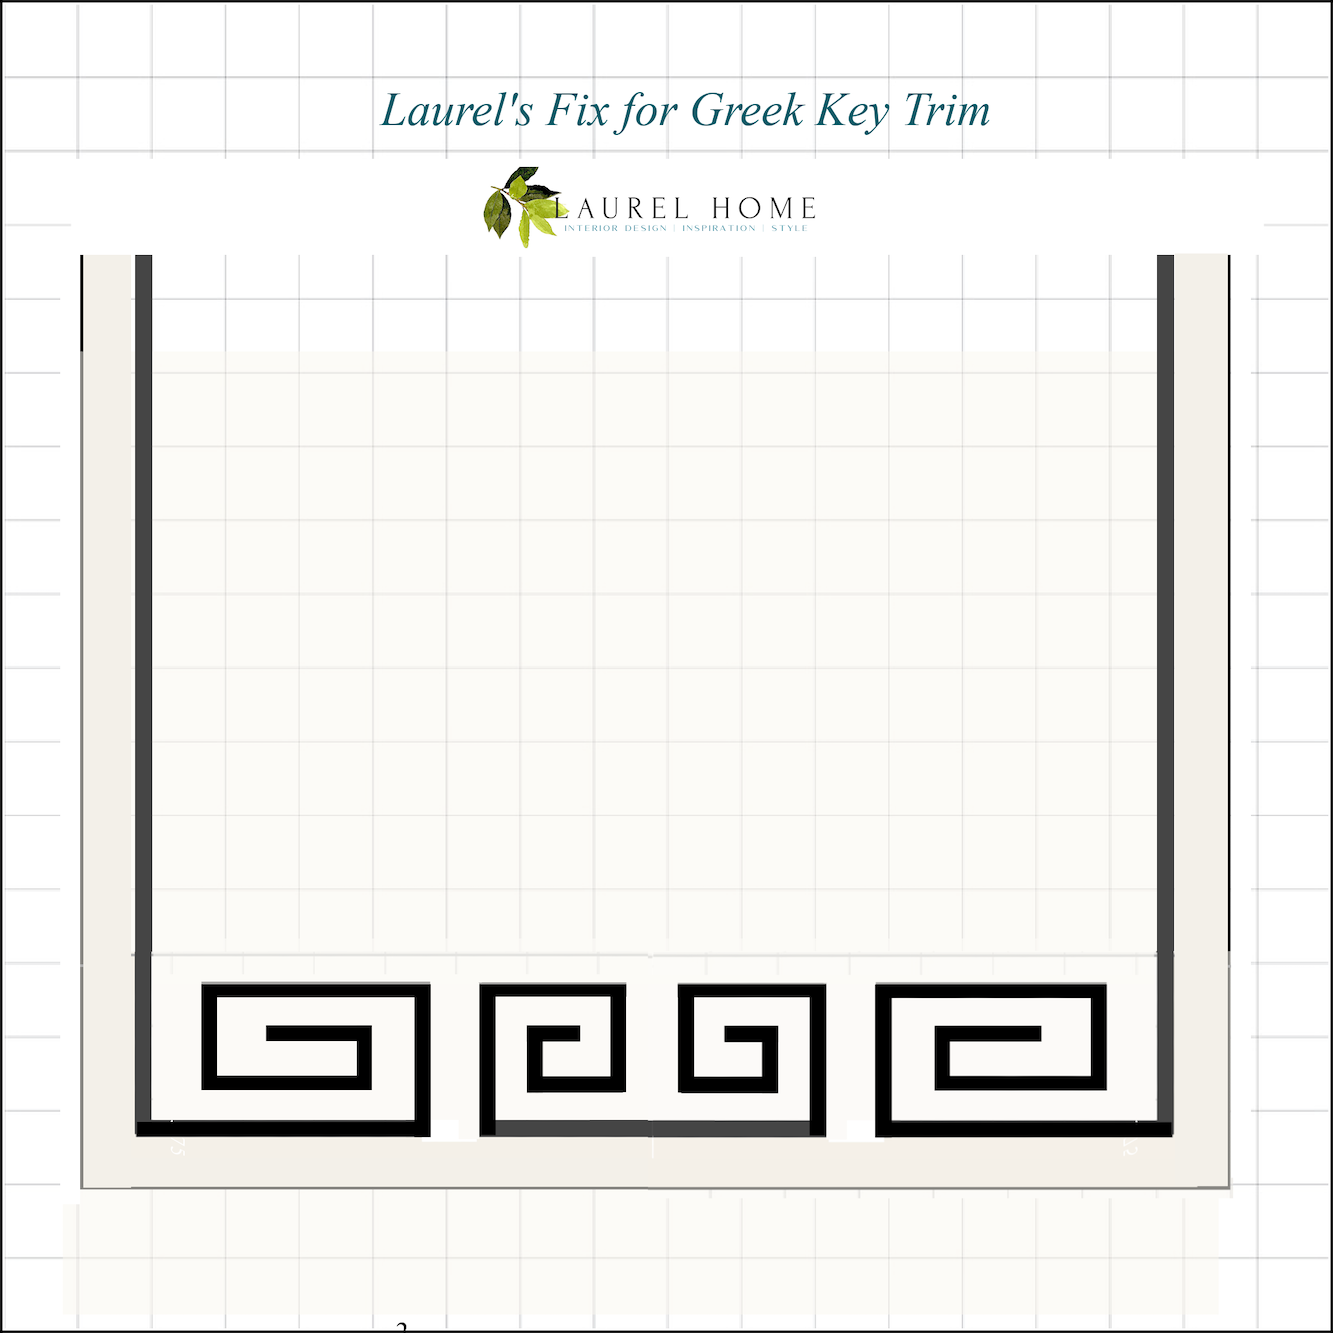
Oh, my! That’s so much better.
Below, you can see on the left side the pieces that would need to be changed.
Below is another option, which is only to do the ends, but then I can’t fix the horizontal pieces, which weren’t spaced properly.
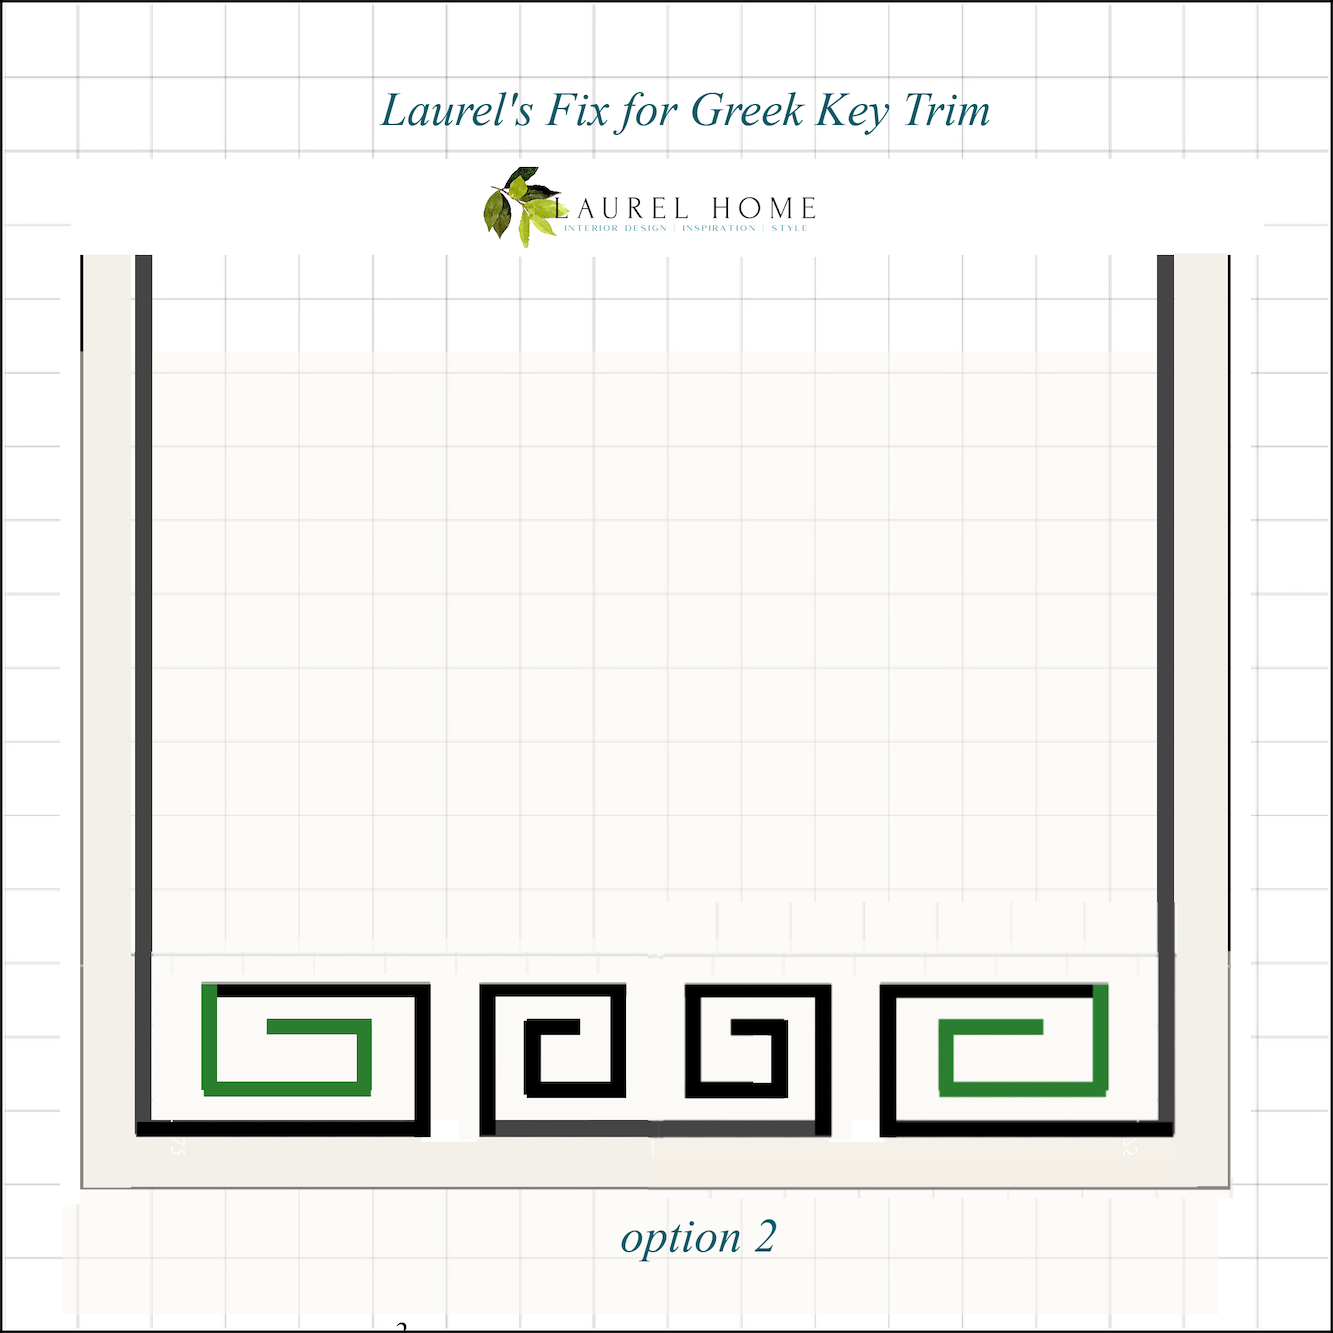
It’s subtle and I could live with it, but I prefer this one below.
Below, in a side-by-side comparison, you can see what I specified on top, and on the bottom what I got. The one in the middle is the fix that I like a lot.
This would be a lot of work, but I think it’s something I can handle. The trim is glued and sewn on. The tough part is undoing the tiny stitches without ripping the fabric.
In the meantime, I reached out to Dianne a couple of days later and said that I was worried about her.
Still no response. I hope she’s okay!
Of course, the trim on my Roman shades should be my worst problem. And I bet some of you won’t have any idea what I’m talking about.
But, if you were a client and complained, I’d have to concede that it needed to be taken care of.
Ugh. This is a painful reminder of why I’m so glad I don’t have to deal with stuff like this. Over the years, there were dozens of problems like this one.
Okay, for those with experience putting on trim without sewing. What do you use?
Some of you, I know, don’t like Stitch Witchery. There are other products.
Also, I don’t mind having to put in a few hand stitches. But maybe it won’t be necessary?
Thank you, I really appreciate any help you can provide.
Okay, now for the serious business. The entire world is already immersed in the real Black Friday sales.
Please do check out the all-new Holiday Shop!
I have given it a HUGE over-haul.
There are many links to dozens of decorations of all kinds, and the gift guides are updated, too. I’m still adding more things nearly every day.
And also, there are some killer sales on the HOT SALES page.
xo,

*********************************************************
Part 2 Begins Here
Before I get into today’s part 2, which concerns the unfinished entry to my home, a few words about the window treatments.
Thank you for the many kind comments. However, a few read into the post and offered advice I wasn’t seeking.
My only point was to find out what product would be best to reapply the trim.
I am not trying to conjecture why the mistakes happened, as the diagram was sent again. Also, to be clear, I am not asking Dianne to do anything, and I did express my gratitude for her taking this on, which was entirely her idea.
I also offered to pay her, but she refused. Yes, she was being more than fair. However, I do wish she had followed my diagram. I can be grateful and disappointed at the same time; just like I can be happy and sad at the same time.
The good news!
The areas to be fixed are only a few inches. The most challenging part is removing the delicate stitches without wrecking the fabric, but so far, so good. Plus, I just received a kit with a proper seam ripper. I was using tiny, sharp scissors, but this is better.
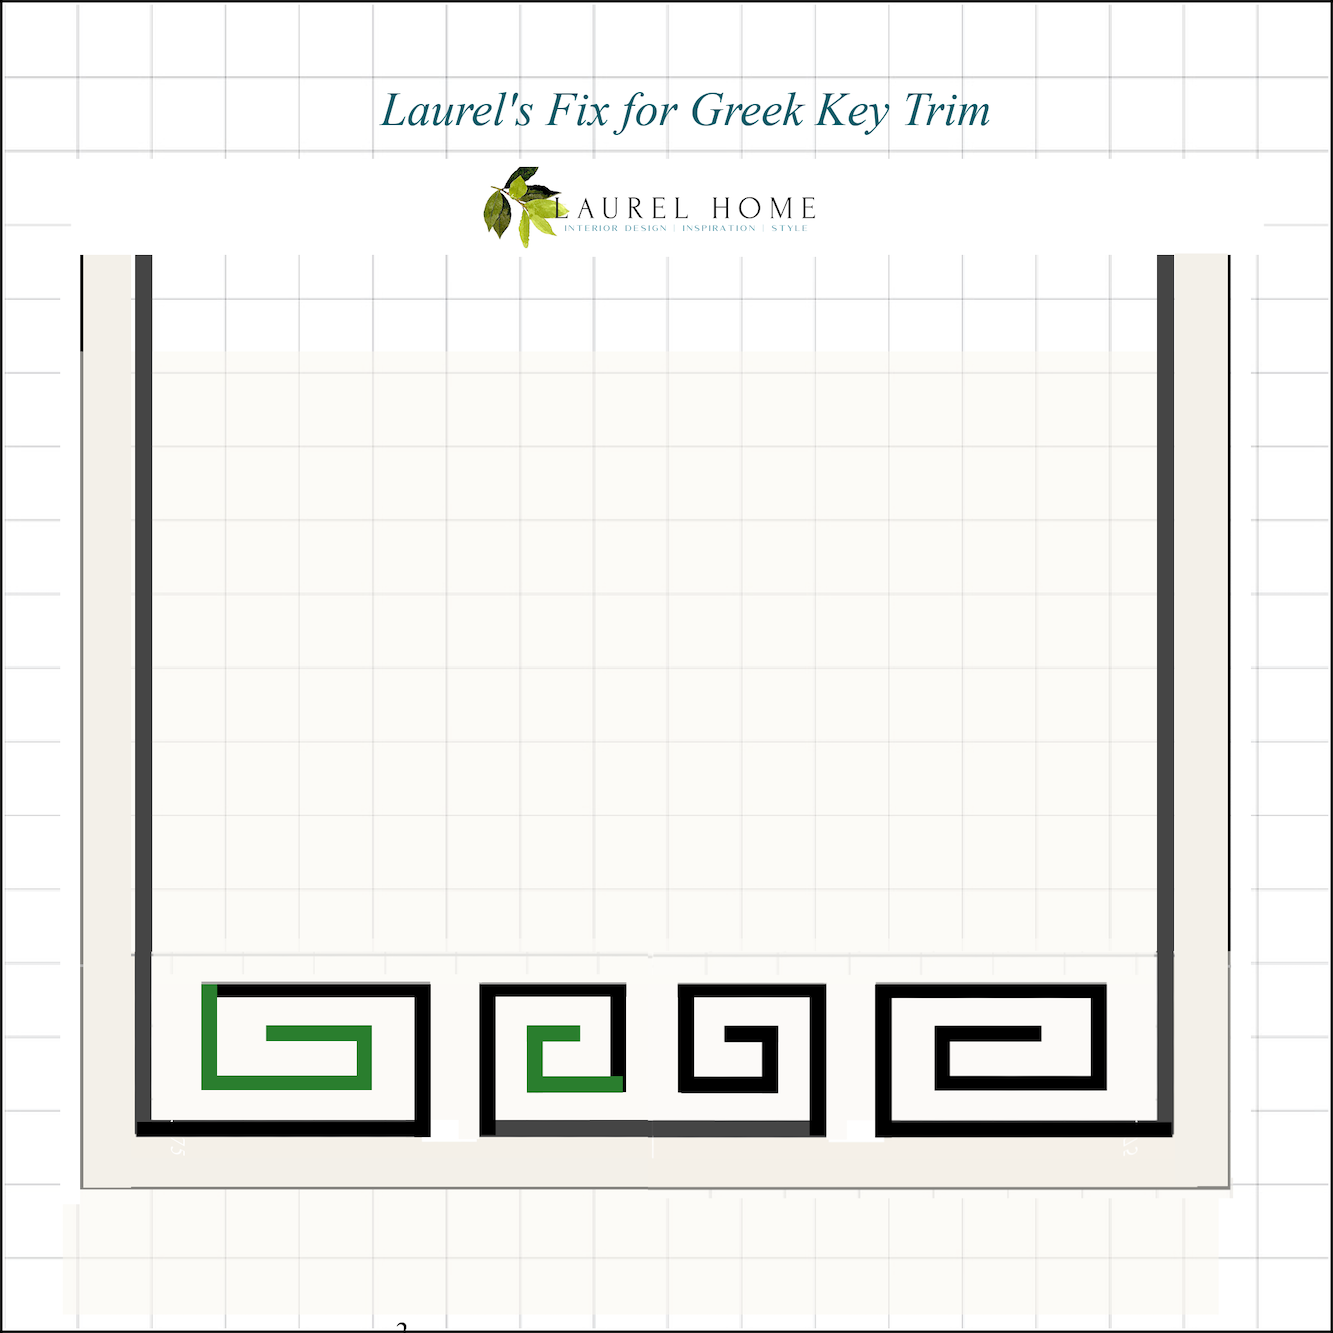
Anyway. I’ve figured out the solution, and here is what I think is the best combo of what looks best + will be the easiest on me.

The pieces in green are what needs to be taken off and adjusted. I also purchased some new grosgrain ribbon– just in case.
Below is what the finished shade will look like.

If only it were as easy as fixing it in Picmonkey. haha.
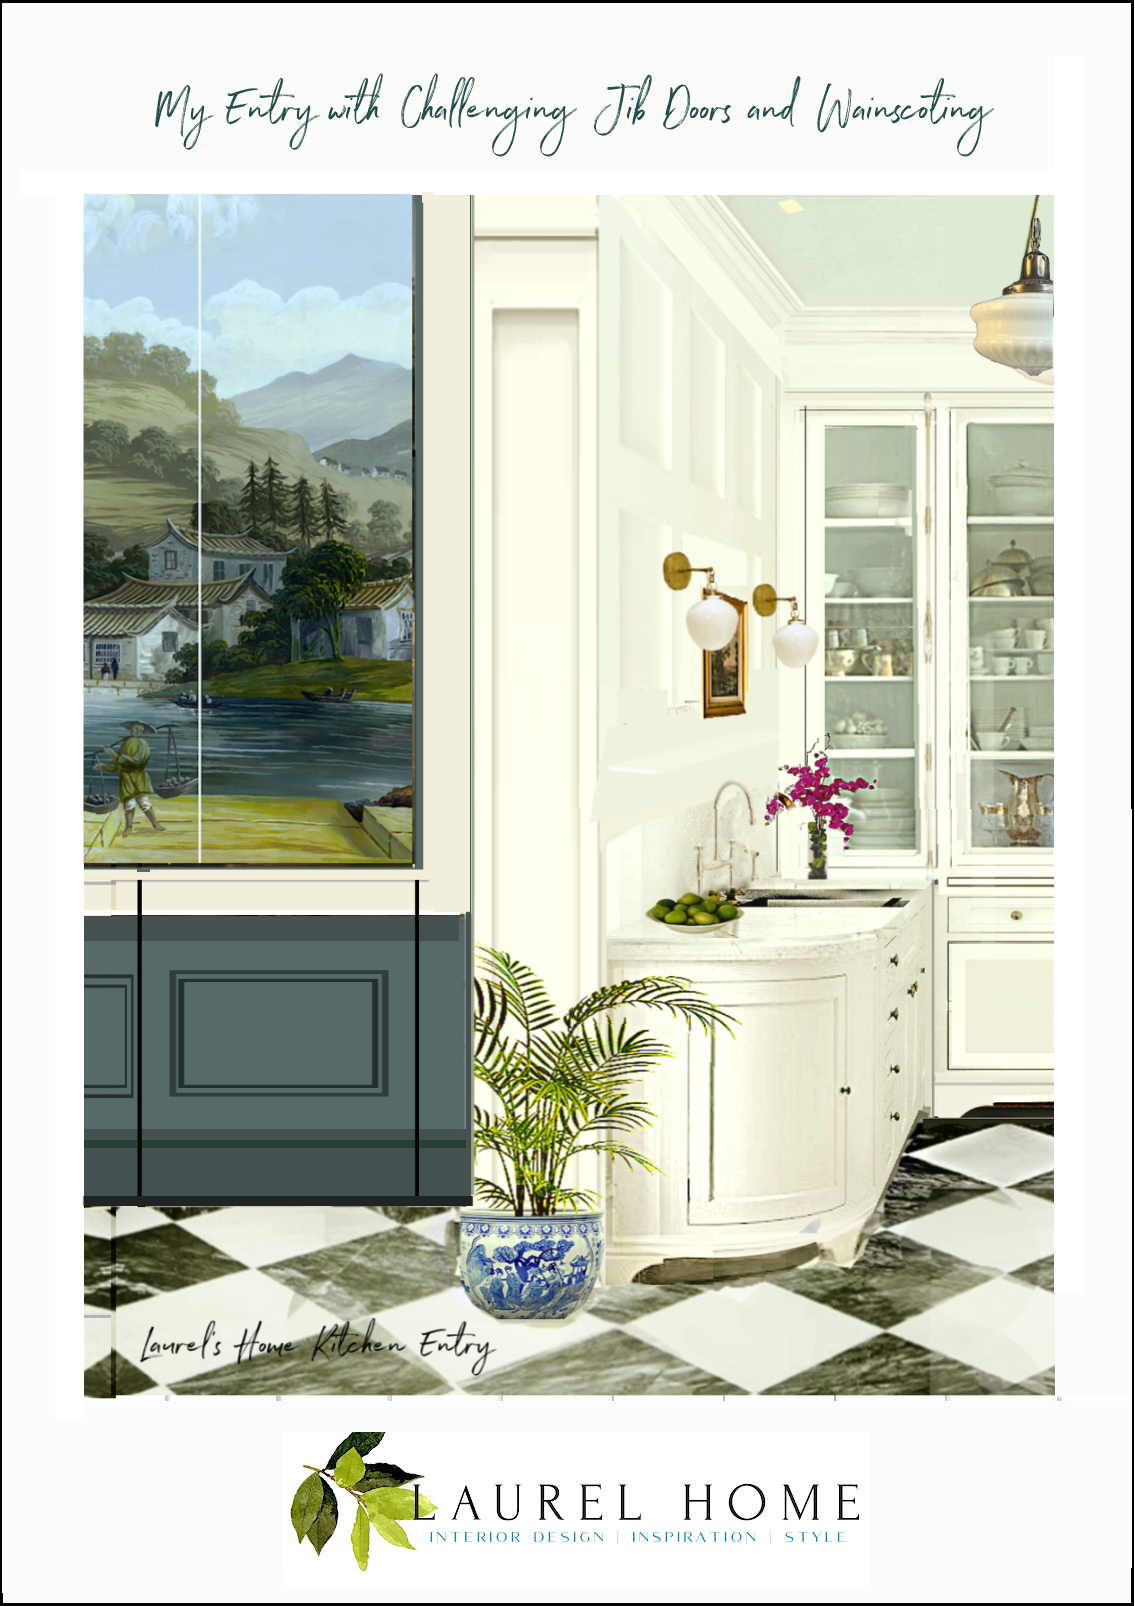
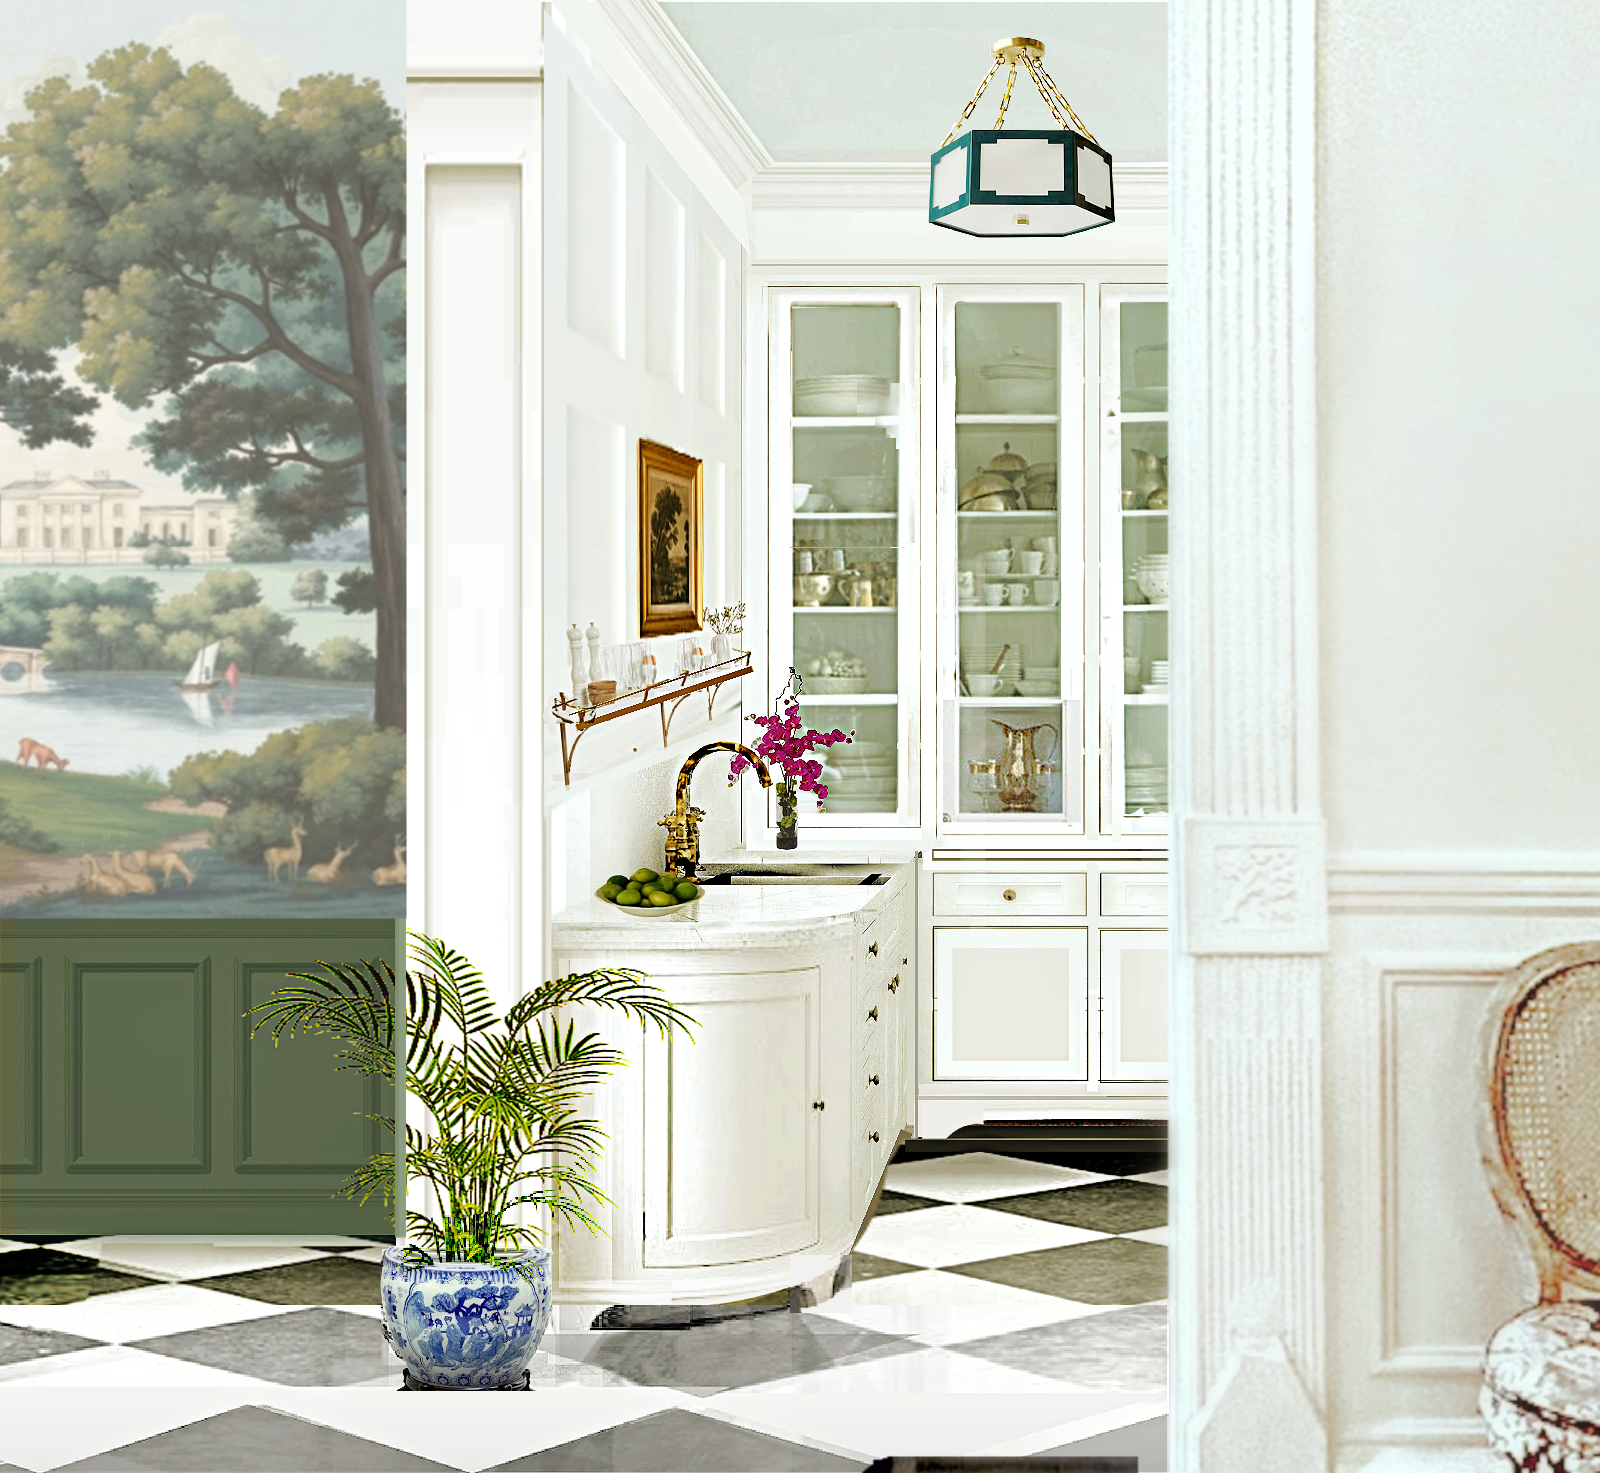
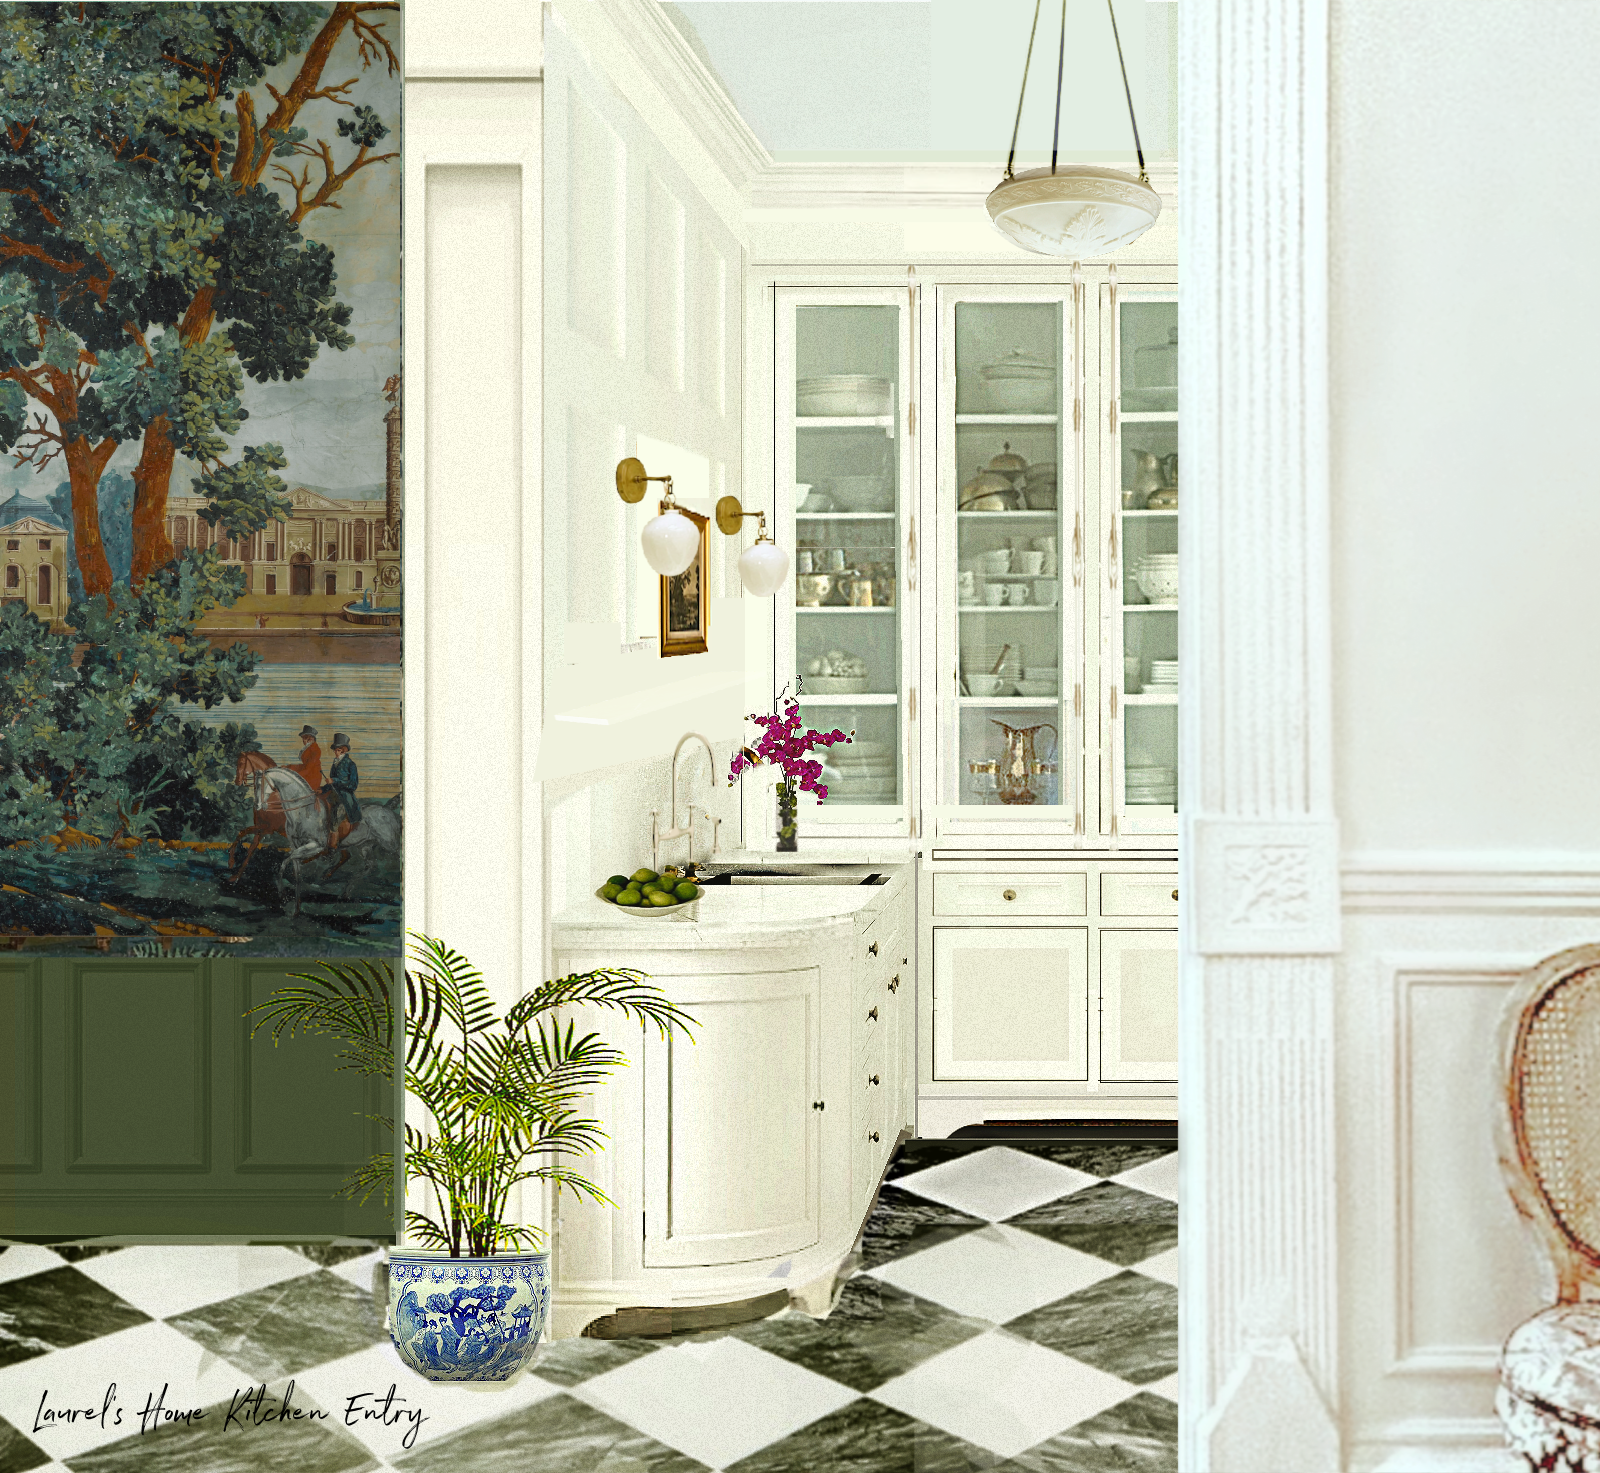
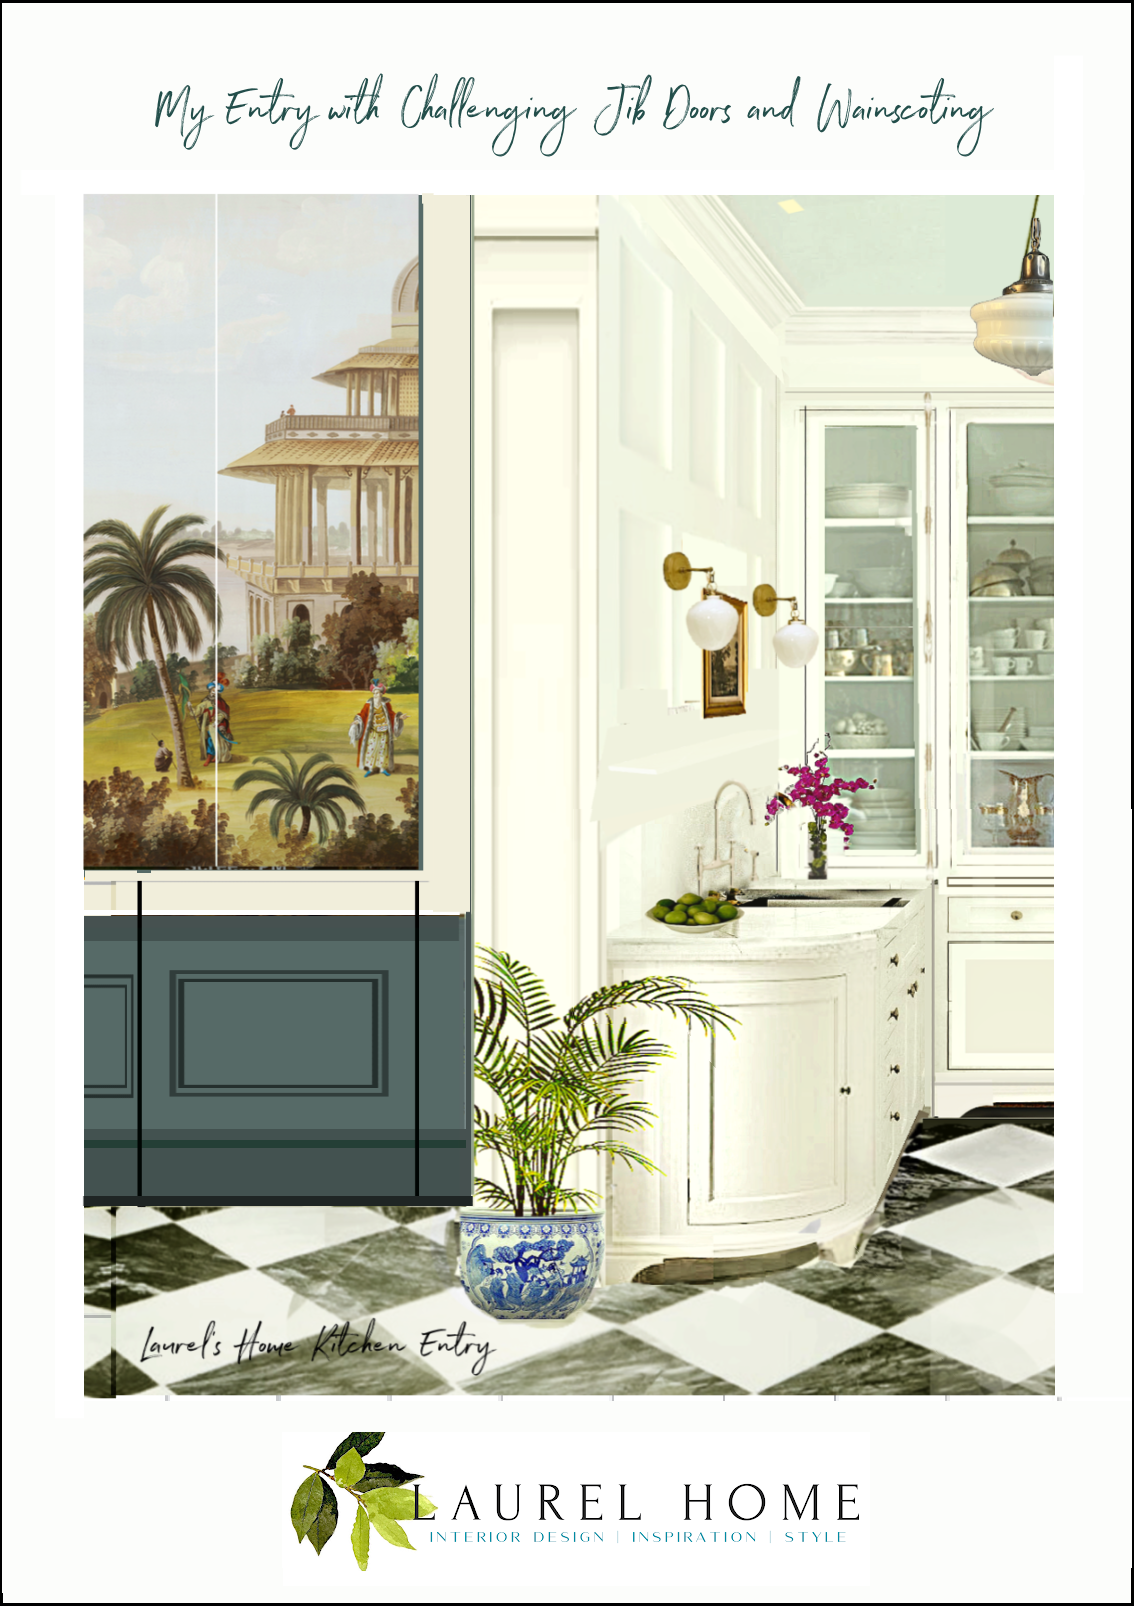
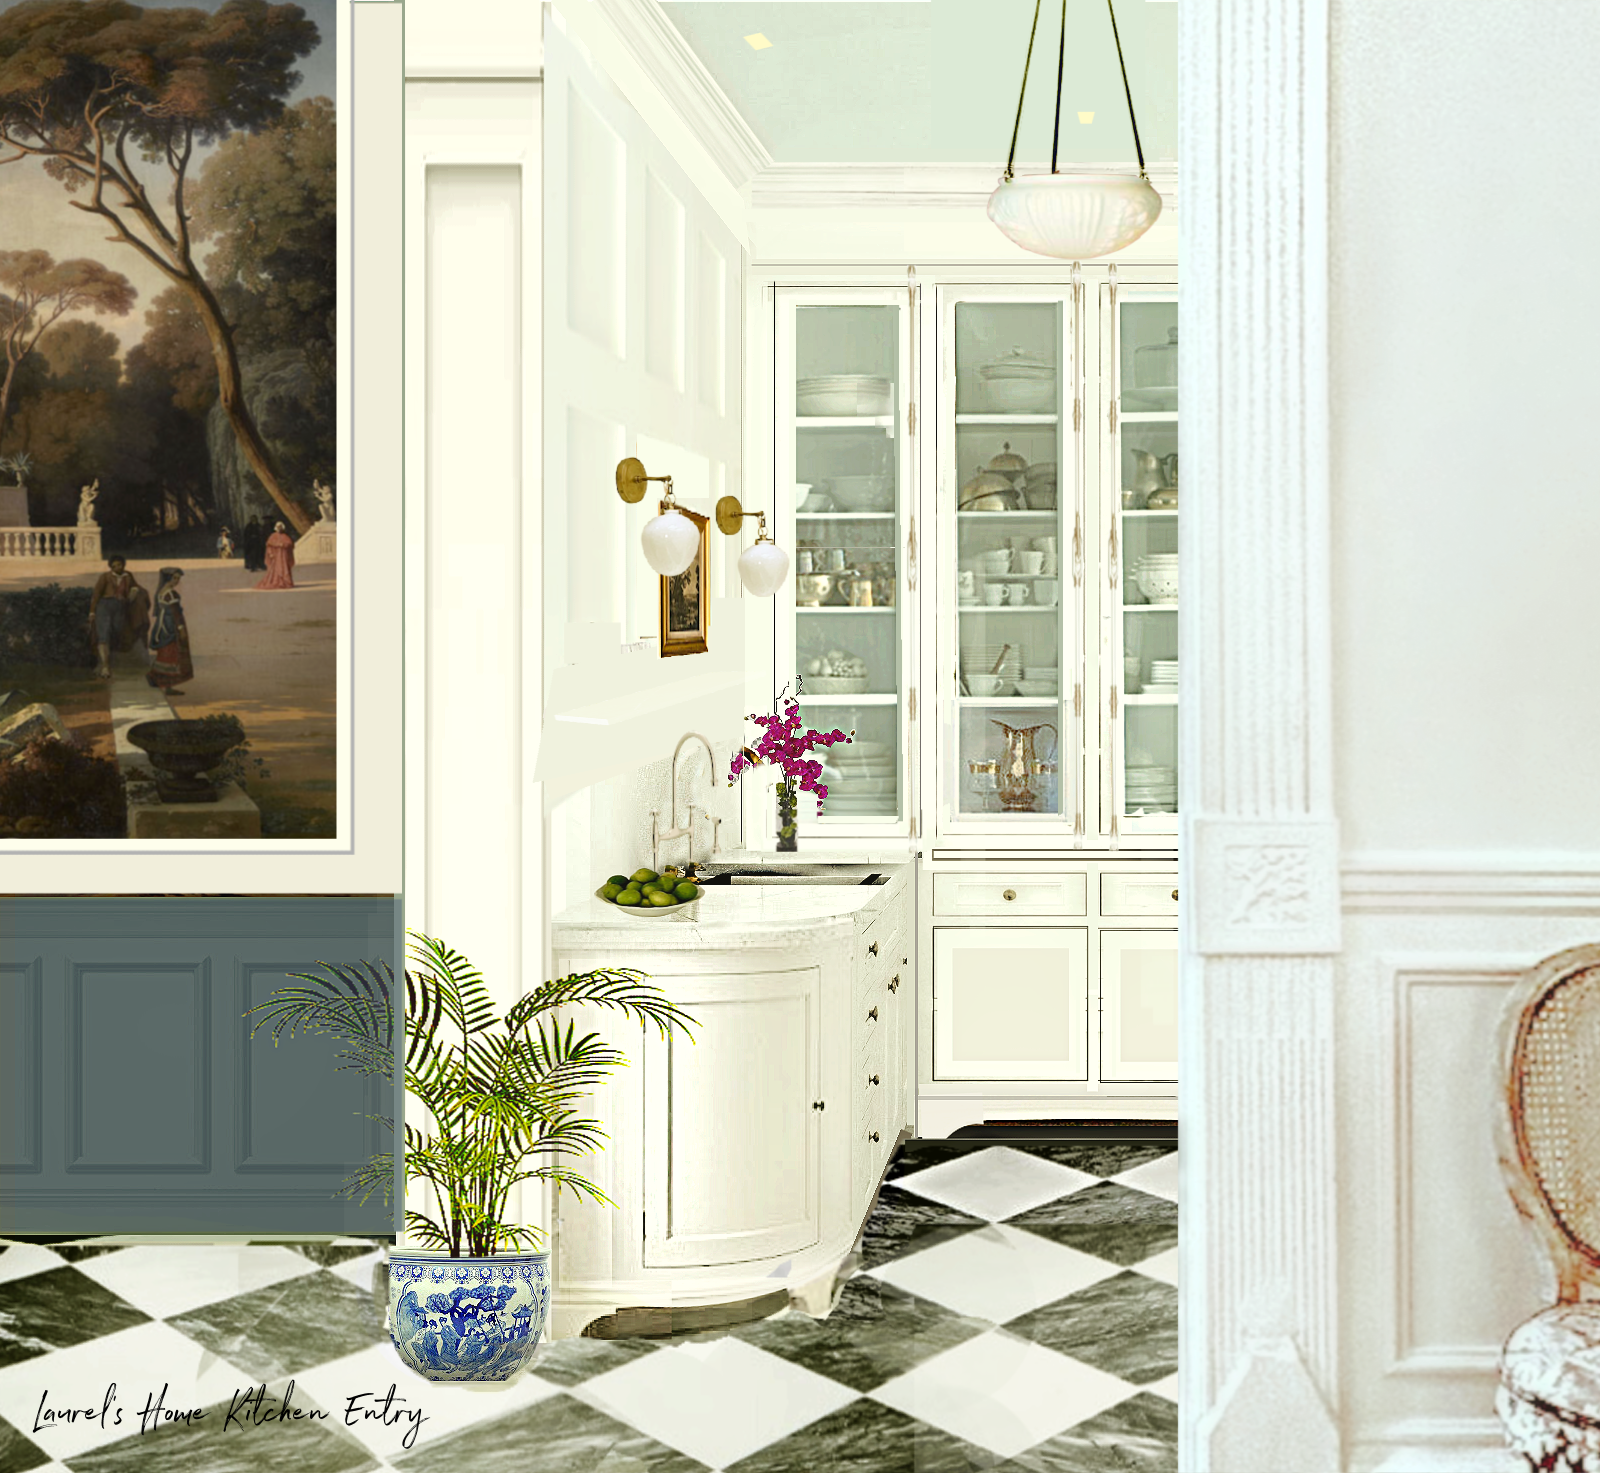
Okay, part 2 is the entry wall covering.
For important background information, please check out this recent post.
While I love the tapestry, I decided that making what I have work is too fraught with challenges.
Therefore, I went back to the drawing board.
I searched and searched for a paper with a beautiful verdure tapestry pattern.
In the name of time, I won’t bore you with minutiae. Let’s just say I couldn’t find anything that worked in terms of a verdure tapestry. The closest was Watts 1874, but ever since this brief encounter with a rep, I’d rather not work with them. Besides, their prices are going up in January, and I already found their prices to be quite high.
Sooo, I went back and re-visited all of the previous choices that had been rejected.
It’s not that I don’t like them, it’s that I liked the idea of the tapestry print better.
In the end, there was one that clearly stood out. And to give you a clue, it was the last one I shared before it changed to the tapestry. So, for the adventurous, please feel free to do a search for entry mural in the search box.
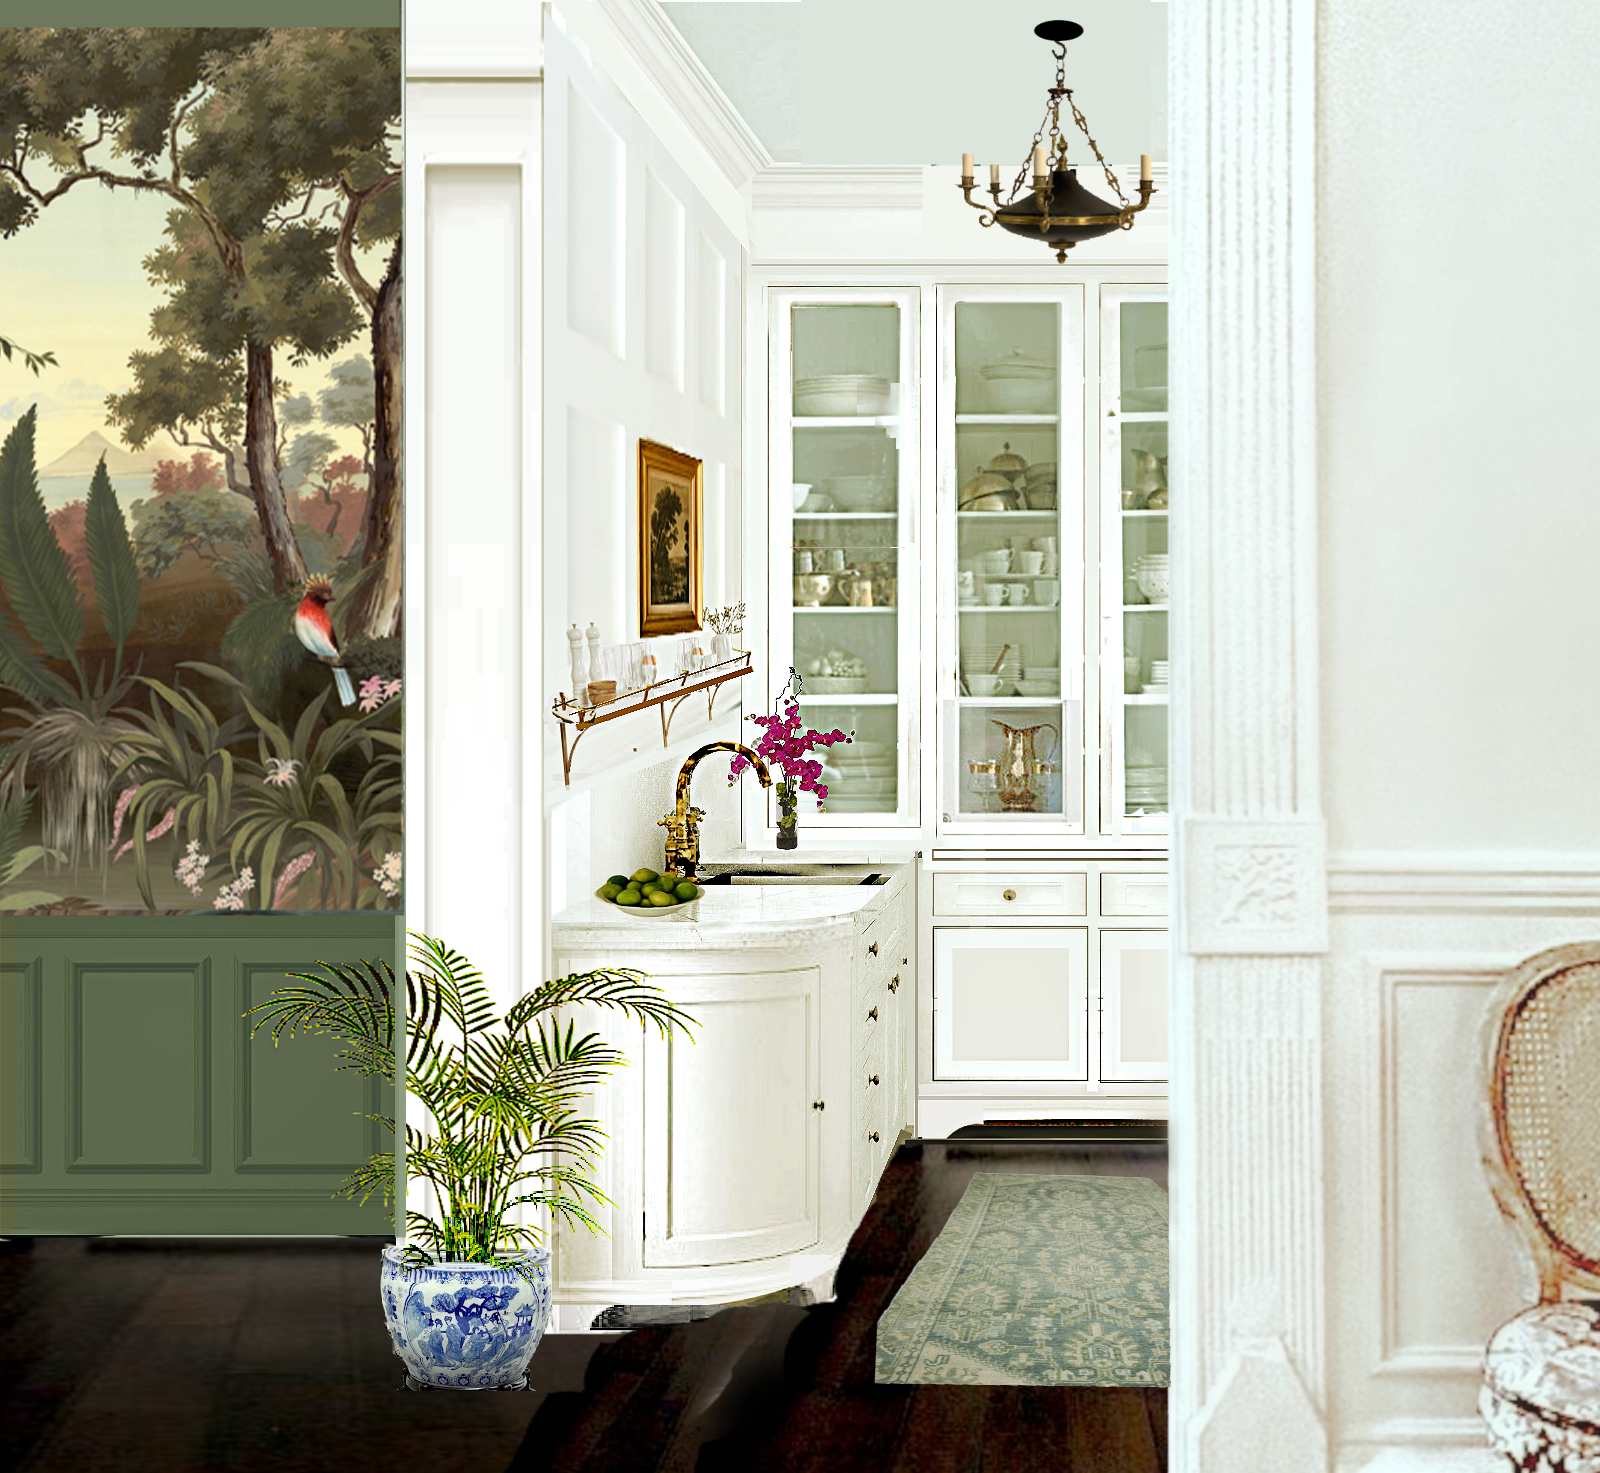
OR, for the busy, can’t be bothered, or anything else, please select which one of the murals below I selected.
The numbers are below each image.
1
2
3
4
5

6
7
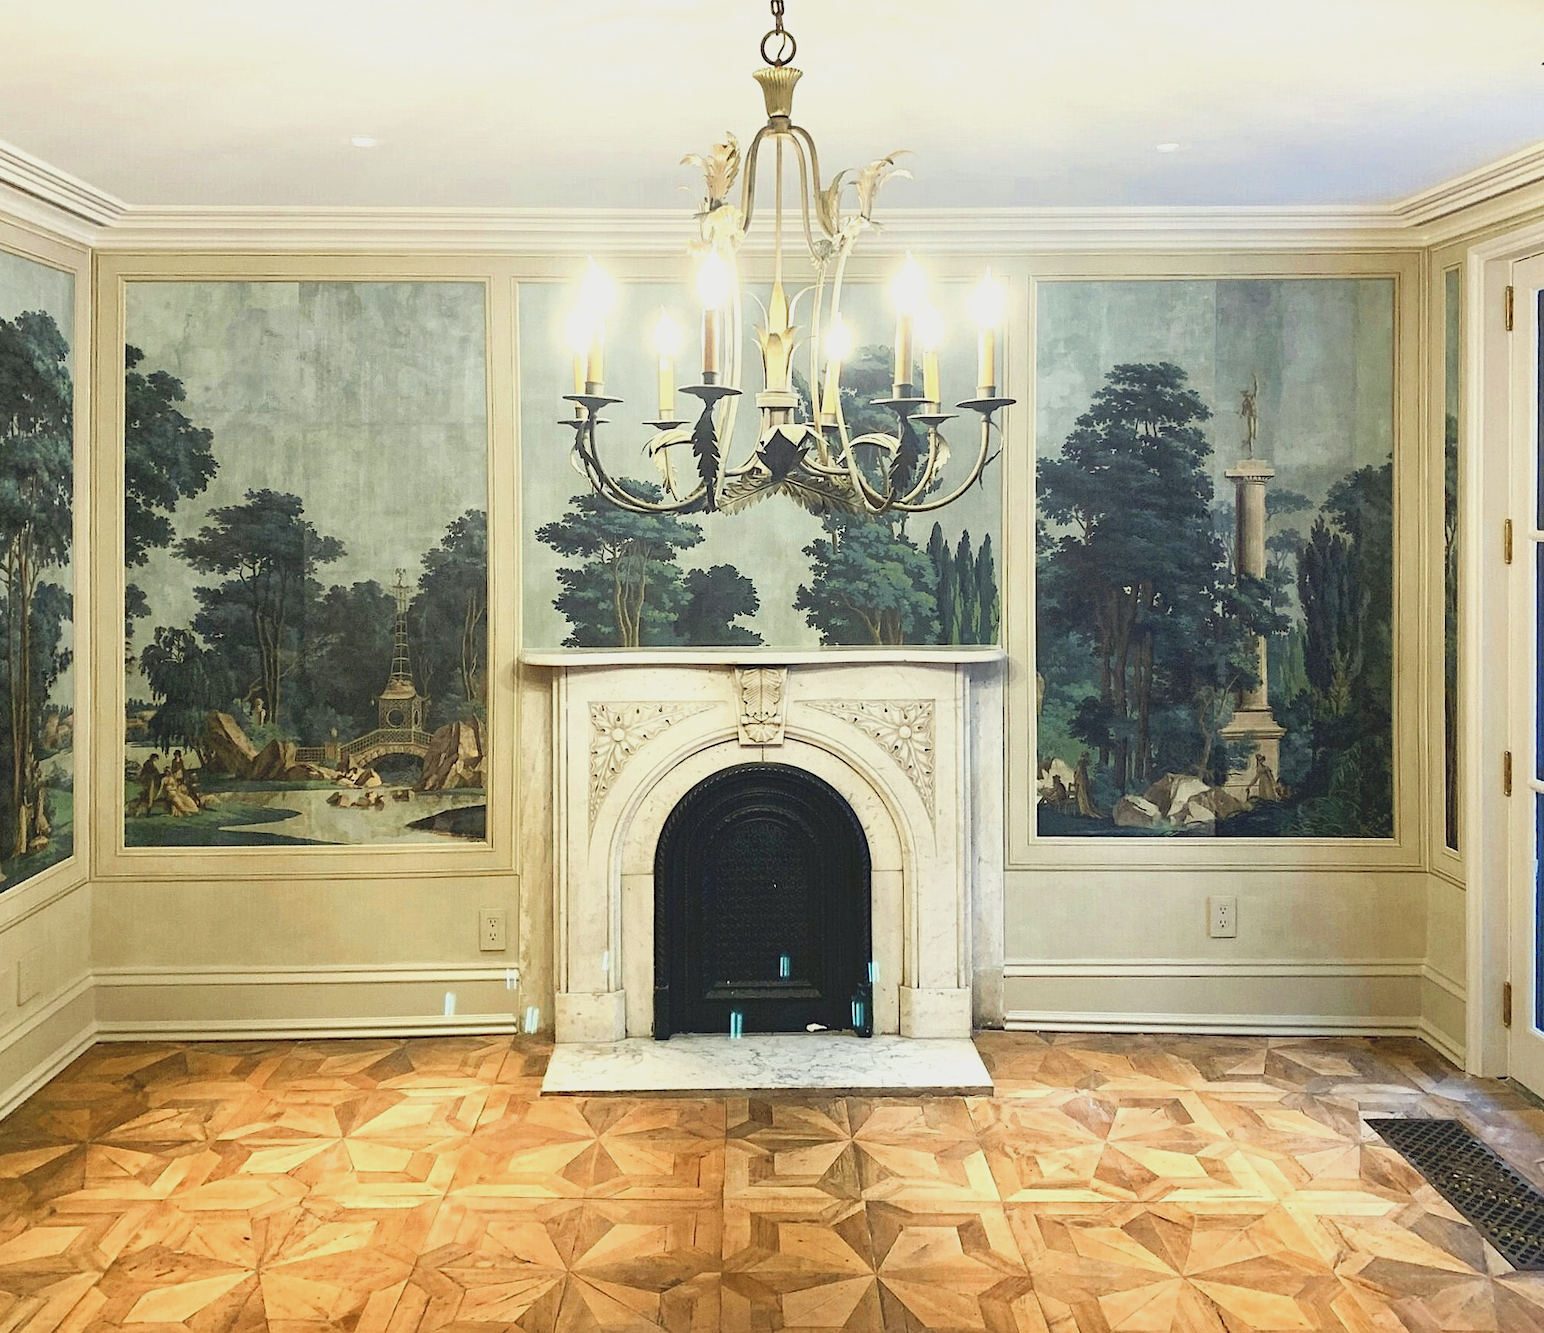
No, not this one. I wish! This is an antique Dufour wallpaper that was painstakingly installed and refurbished.
Which one, 1,2,3,4,5,6,7, do you think I chose?

A special shout-out to the Mural Source! This is a wonderful company that I highly recommend.
xo,
***Please check out the recently updated HOT SALES with some of my favorite Black Friday Sales!
***AND, the all-new 2025 HOLIDAY SHOP with new things added since Sunday!
Please click this Amazon affiliate link.

Please click the link before items go into your shopping cart. Some people save their purchases in their “save for later folder.” Then, if you remember, please come back and click my Amazon link, and then you’re free to place your orders. While most vendor links have a cookie that lasts a while, Amazon’s cookies only last up to 24 hours.
Thank you so much!
I very much appreciate your help and support!
Related Posts
 Boston Marathon 2021 + Back Bay Houses Early Fall
 A Reader Needs Your Help With Her Small Living – Dining Room
 The WayDay Sale 2025 is Way Too Good to Pass By!
 Ultimate Guide To The Best Kitchen Floor That Isn’t Tacky
 The Truth about Restoration Hardware (RH) – 7 Years Later
 Can A Modern-Style Home Mix With Traditional Mouldings?
 30 Astonishingly Beautiful and Best Front Door Colors


52 Responses
Wow. Loved your solution
I got so confused on the wallpaper situation. Looking forward to seeing how it ends up. I assumed the last one is from that mural company you reference and this the winner. Good luck Merry Christmas and Happy New Year!
I’m sorry Kris. My fault. As I was writing this, I thought it would be part 2 of the post with the kitchen, but when it came time to attach the second post, I saw that there was already a second post, so I made it a separate post. I should’ve linked it to the first post about the kitchen and then you’d have all of the details.
Here’s the link to the first post about the kitchen.
My guess is #6, although it is difficult to tell without seeing more of each mural.
Not at all what you asked, but how about having some custom pillow covers made from that beautiful tapestry fabric that you won’t be hanging on the wall?
I haven’t read all the comments, but I think I last saw you showing #5 (The View from Rome). I’m confident that whichever one you choose will be just right! Glad you had a quiet, but nice Thanksgiving. We did, too :] I’m thankful that I’m able to learn and be entertained by such a giving and knowledgeable person as yourself! Thank you, Laurel!
Not sure which one you chose but my pick is #2. Not a seamstress so can’t help you there!
Hello Laurel,
I actually love #1, it’s a bit unexpected and the colors are really vibrant and seem to lighten your entryway. It’s been such fun to see your entire process- and how you solved tricky reno issues. As a designer myself, I love to see your thought processes. Keep doing what you do!
Laurel, I’m so happy to have supplied you with helpful info! Look forward to hearing an update, fingers crossed & prayers said for a great outcome!
Seems it has been a rough and wild ride! I now realize I’ve been reading into things far too deeply. Somehow, I missed the fact that you were just looking for glue recommendations. Understandably, you have your plans in place and are just seeking validation from the unknown masses. Certainly, in the end everything will come together.
Be well, and happy holiday season!
Love your pick, very Ralph Lauren! A timely choice with 2026 being the year of the horse. Here’s hoping for a fast paced, lively, joyful year! We all deserve it, Happy Thanksgiving to you and your readers.
All the best!!!!
Regarding the mural, I love #4 and #7. I love seeing something exotic (like the parrot and the palm trees) in an otherwise traditional decor. But I’ve learned it is the exact opposite for many women. Your home is beautiful. I love watching the progress. When you share your challenges, it gives me courage to tackle my own. We are currently grappling with a very challenging window treatment problem so I feel your pain.
Happy Thanksgiving, Laurel!
I’m going with number three because it has horses in it. But I also thought seven was very nice.
Best wishes, Laura
#4 from June ’24
#7 the one with the bird. Is the winner for me.
Oops meant # 2 or # 6
Happy Thanksgiving! Hope Cale feels better soon.
Took quite a few scrolls to pick one, since they are all stunning. # 7. Love the bold colors. Wondering if you picked # 2 or 7? Can’t wait for the answer.
5 or 6 difficult to decide
#3 or #6
Did you choose #3?
This may be a crazy, impossible “solution,” but my first thought was to do a Frankenstein combination of the two sets of shades. Cut off the new bottom with the mis-spaced trim and replace it with enough from the original shade to add the length needed to cover your windows and the correct trim. At any rate, the proportions of the new trim will always bother you, as it would me, and I hope you can fix this to your satisfaction.
Really thoughtful post. I love how honest you are about those two design challenges — especially the Roman shades issue. It’s not just a technical mistake; it’s something you live with every day, and you’re clearly not ok with compromising on detail. I admire the care you took in re-diagramming the trim, and your willingness to redo the work to make it right. It’s a great reminder that even small details matter a lot in design.
Laurel, I see why you don’t like them. They look like modernized version of the design and I sense you are a purist so it’s not going to work for you. I actually didn’t see them as no go. I would just chalk them off as supporting cast members and not notice after awhile But in order to obtain the perfection level of excellence you have throughout your home you may find yourself reordering it a third time to get exactly what will make you love them. Sometimes that’s what we end up with doing. Good luck and I think your home is lovely.
There are lots of good suggestions in this thread, so I won’t repeat them.
Cutting the threads holding on the trim is not a problem with a simple stitch picking tool. But maybe you shouldn’t try it.
You can use the fabric and materials from the first set to make a section that attaches to the top or bottom. You might use the bottom section from the first set on the new set? Bottom is by far the best option I think.
Without seeing these in person, it is impossible to realize fully what the options are and which option is best.
You need a local person or workroom to analyze this problem and come up with a solution.
The cord is not a problem. Buy new cord and start from the beginning. You could also take the trim from the first set off and use that if you somehow need it. As someone already said, the dowel is just a trip to a hardware store.
You are in Boston. There are certainly people who have the skill right there. It might be hard to find them, but they are there.
But I can’t stress too much that whomever does this needs to see everything IN PERSON.
You were very clever to study how to reposition the trim without disturbing the everything too much.
The proportions would be an eyesore to me every single time I looked at them. So do get this fixed somehow.
p.s. thanks for the complement a little while back!
Laurel, If you’re committed to modifying the shades yourself, I’d suggest you use fabric tape. I have used basting tape for sewing (SLC Double Sided Basting Tape (1/2″ x 50 Yards)) and it does hold up well. But, another product on Amazon,
“Double Sided Fabric Tape” by Aosdc looks to be what you need for a permanent application. I like the idea of the fabric tape due to its width & uniformity. Tape will look much better than glue should light shine through. I’d use basting tape to get the design just right and for tucking edges. Then use the fabric tape as the final step. Good luck!
Hi Susan,
Thank you so much! This is the response I was looking for!
Dear Laurel
Hunt around for a good workroom in your area or a willing seamstress. So many excellent suggestions from your readers. And why not send Diane a gift by way of thanks for all that she did do correctly…
I know you’ll find a good solution for this problem.
Happy Holidays!
You need a seamstress to handle this-iron on tape melts like plastic.
Hi Mary Ellen,
I’m up for the challenge!
Agree with Kristy, but understand how very disappointing for you. A dear friend always reminds me…”what doesn’t kill us, makes us stronger”. And you are strong! Maybe a new panel at the bottom of the shades with your key placement? Solves length and look. Dowel easy to get, or take out of existing shades if you scrap them. Cord solution even easier. Third time is the charm. Good luck.
Hi Candy,
Oh my! This should be my worst problem. In the scheme of things, fixing a bit of trim is nothing at all. The cord is fine now. I just double-checked.
Hi Laurel. I’m sorry this has happened. Yes, it would bug me too. You need to fix it — but I believe a good workroom will be able to make you happy. I have three comments: 1) I’m a decent seamstress, but I wouldn’t try to do this myself unless I had already tried to find a first-rate workroom that would attempt to fix it. It’s not just the experience and the tools, it’s the table, the iron, knowing which machine and which stitch will work. A tip top workroom is the way to go on this, if you can find one. 2) If the workroom recommends cutting off the bottom and doing that part over, with a plan for matching the ribbon, I would go with that. If you add one little “square” or “key” in the vertical trim a few inches above where the main horizontal pattern starts, that might make it easier to join the new piece of tape without it being too noticeable. Of course, that assumes you can find tape and fabric that will color match perfectly. 3) I’m familiar with the fabric you used, but I’ve never sewn with it. I’m not sure you can get the iron hot enough for stitch witchery to work reliably. I am personally not a fan of stitch witchery because it seems to fail pretty often. Good luck, Laurel. You’ll get through this. Worst case scenario, you take a deep breath, save up for a couple months, and start over, but I don’t think it will come to that.
Hi Tsippi,
Thanks for your ideas, but like I said, earlier, there are several problems with having someone fix this, if that’s even possible. You know the old saying, “putting good money after bad.”
I’m sorry to hear that these weren’t to your specs. A bit unconventional for Roman shades, but could you have a new piece of fabric with the correct trim (or something equally acceptable) made locally and applied over the bottom of the shade? It would have to include a blackout layer so the current trim doesn’t show through.
Hi Alisa,
No, I don’t believe that would not work because it would look odd when the light is shining through the shade, but thank you for your idea.
Hi Laurel…sorry about your roman shade conundrum…I sew for myself (clothing and home dec and pretty much have made everything once!)… I do like stitch witchery, but since you do not, I would suggest a TINY amount of good ol’ Ehlmers Glue (use a tooth pick) to tack it in place once you get the trim EXACTLY where you want it…and then let it dry…be patient. Work on a flat surface. Hand-stitch with a very sharp needle and thread after it has dried. I had to scroll back and forth to see the difference…You have a very discerning eye. Good luck and BE PATIENT!! And also…”measure twice, cut once!”
Hi Téa,
Thanks for all of the advice– especially, the “be patient” part! I’ve never used Stitch Witchery, I am only saying that based on what other readers have said.
Laurel, you are very brave. I had a similar experience some years ago. I tried to remove braid from drapes – the braid had faded from exposure to sunlight. Well needless to say I was not happy with the result. I should have engaged the decorator – but it had been years since I had worked with her and honestly, I thought I could do it. I sew pretty well. But I am not a pro with a workshop that has the space and machines and stuff you need. Anyway, your other readers have offered positive encouragement – so I won’t be negative. I just wish I had not done it myself. The drapes were Zoffany and were expensive.
Hi Marlene,
I can’t see what you had to do but this is only a few inches of trim. The most difficult part is taking it off.
I would do it myself, with the caveat that there’s going to be some trial and error involved. I would turn the shades inside out, so that I could remove the stitches from the reverse of the drape fabric, rather than trying to pick at it from the front of the shade. As for the for the glue, that’s hard to say how it can be removed. I would hand stitch the trim into the proper place. Best of luck.
Hi Caryl,
Turning the shade inside out isn’t an option because it would mean taking out the entire hem, plus removing the bottom set of rings. I’m pretty good at hand-stitching.
Hi Laurel,
You can easily pick up another dowel at Home Depot. They could even cut it for you to the length you need.
As for fixing the trim, if you can’t find a local seamstress, I bet you could find someone on Etsy to help you.
I enjoy handstitching so if it were me, I would remove, reposition, and stitch them down and forego the glue. (Ugh. Belt AND suspenders?) If the glue is simply to insure the placement is correct and not have to rely on pins, there are washable fabric glues available. Perhaps that’s what was used? (It’s commonly used for appliqué work.) If so, careful spot cleaning may get the residue off. However, the glue may have caused some staining, although not likely. For the pinholes left behind by removing the stitching, depending on the fabric you may also be able to nudge tthe woven threads back into shape. I use the point of a pin, and do some brushing with an old toothbrush. (This doesn’t work on satin or taffeta, so it does depend on the weave and the fiber.)
Not everyone cares to do this work as it is very finicky and requires patience and persistence. However, I think a good seamstress should be able to take care of this for you.
I agree that the wacky proportions would drive me nuts every time I saw them, so I would try to make the repair. Or hire it out. You would know from doing the first one if it will work out and I say you have nothing to lose by trying.
Hi BrigittaV,
The glue comes off with rubbing alcohol 100%. The problem with hiring someone is what you said, plus around these parts, it will cost at least $500 a shade and probably more.
Laurel,
I know this is a tuff one but this too shall pass. I only write this because I also like things to go the way I intended. I think Diane was more than fair.Think of all you have accomplished with this project! Love your work!
Hi Evelyn,
Indeed, she was more than fair, but this isn’t about fairness.
Good morning Laurel,
I have taught myself to make Roman shades and have successfully completed one that is 7-1/2ft wide. When it is down, there are no channels visible to break up the Tommy Bahama pattern.
I say this, not to brag, but as an example that there are plenty of people who say you can’t do something when determination, careful calculation and patience can achieve it.
You are fortunate that if you remove the trim and the sun shines through and shows the glue and stitch marks, you can go back to the original ones.
However, you might be able to lengthen the original blind by cutting off the required amount from the new blind and adding it to the top of the original. Of course this would have to be done where a rod goes.
Knowing the amount of work needed to do this, and the difficulty in finding a willing, capable and affordable trades person (you usually only get 2 out of 3 of those) I would go with another option.
Because of the colours you’ve chosen for the blinds, I would have sun blocking put on the whole of your windows. I don’t remember if you have already.
There’s also the option of a sculpture placed in your garden that would artistically block the sun.
As for the length of the cord, you might be able to remove the correct lengths of cord from the new blinds, and tie them at the very top of the principal blinds. I’d use a knot similar to what we use for tying flys for fly fishing.
I’m afraid to say, that in my opinion, the error in both cases in yours because of the decision – which seemed to make sense the first time – and not providing all the info because you assumed Dianne had it.
We’ve all been there.
You can solve this.
Hi N,
Please don’t be afraid. lol However, nothing was assumed as I did give Dianne all of the information including the diagram, the second time. All of the measurements are there. She was far more accurate the first time. For the purposes of this post, I did not feel it necessary to share every detail. In addition, while disappointed, the main point of the post was what product(s) would work best to reapply the trim. I did not ask anything of Dianne either time. In fact, I offered to pay to have them redone.
As for the sculpture. It would need to be at least 15 feet tall to reach the bottom of the shade. The living room is on the second floor. Yes, there’s a wall to the garden, but putting anything on top of the wall would not be allowed.
Finally, those shades don’t work because the cord was not made long enough to reach when the shade is down.
Laurel – I found you by chance as I have been planning a project – your sense of proportion and balance are so impressive and has made me scour your content ( which I never do given my flea-like attention span) . The proportions would bother me too and my nest is so important to me…..Im sorry about Diane…I too hope she is ok…can you find someone else to fix it for you?
Hi M,
If I had a working relationship with a workroom, that might be possible, but otherwise, it’s highly unlikely for all of the reasons imaginable, plus, it would be exceedingly expensive.
I would make the first set work. Low sunsets are only a few months of the year. If you have concerns about the sun on your interior, put the clear film on your windows that can’t be noticed but turns old windows into e-glass. Get a ladder if need be, set the shades and strings at a height you find most appealing and there they shall remain.
Rather sure you’ll see those glue lines when the sun hits the fabric.
I am afraid your roman shade lady may be too ill to deal with anything more right now. Or trying to pull her life (family) together enough to enjoy what could be their final holiday season together and just can’t address outside issue, especially if her business is officially closed.
Hi Linda,
Th trim is on the top layer of the deep hem, and the stitches do not go any deeper. There are three more layers of fabric underneath, so the small needle holes don’t show. I can also get all of the blue residue off of the fabric with rubbing alcohol.